Sunday, April 29, 2012

Caprese Salad


I don't have much to say about this recipe besides OH MY GOD THIS WAS SO GOOD!!!

I am biased though. Tomatoes and cheese are two of my favorite foods ever. You could have just given me the tomato and cheese alone and I would have been excited. But the other components of the recipe just made it so, so incredible! This was the first time I have reduced balsamic vinegar. I had actually never even heard of reducing balsamic vinegar to a syrupy consistency until just the other month when it was presented to me at one of our new favorite local restaurants. I thought to myself at the time, "Why have I spent the last 26 years of my life never experiencing this before, and how can I get more."

It is quite simple to reduce balsamic vinegar, I have learned. Just earlier today I posted a Portobello, Red Pepper & Goat Cheese Pizza recipe. When I was making that pizza, I thought to myself how much it would set this pizza apart if only I had some balsamic vinegar reduction. Alas, the recipe I looked at for a balsamic vinegar reduction said the process took 2+ hours and I just didn't have the time for that last week when I made that pizza.

When I was planning tonight's dinner though, I wanted to make a Caprese Salad because we got some amazingly plump, red and juicy tomatoes at the farmer's market yesterday morning and I wanted to put them to good use. I just couldn't believe though that the only way to make a balsamic vinegar reduction took 2+ hours. So, I expanded my research.

I came across this wonderfully simply recipe that is exactly what I was looking for. It is simple, straight to the point, and produces a magnificent flavor that made me want to savor every single bite. I have no doubt that I could eat this at every meal, every single day.

Caprese Salad
http://thepioneerwoman.com/cooking/2011/06/caprese-salad/

Prep time: 5 minutes  Cook time: 20 minutes  Yield: 8 servings

2 cups Balsamic Vinegar
2 whole Ripe Tomatoes, Sliced Thick
12 ounces, weight Mozzarella Cheese, Sliced Thick
Fresh Basil Leaves
Olive Oil, For Drizzling
Kosher Salt and Freshly Ground Black Pepper

1. In a small saucepan, bring balsamic vinegar to a boil over medium-low heat. Cook for 10-20 minutes, or until balsamic has reduced to a thicker glaze. Remove from heat and transfer to a bowl or cruet. Allow to cool.
2. When you're ready to serve, arrange tomato and mozzarella slices on a platter. Arrange basil leaves between the slices. Drizzle olive oil over the top of the salad, getting a little bit on each slice. Do the same with the balsamic reduction, making designs if you want. Store extra balsamic reduction in fridge for a later use.
3. End with a sprinkling of kosher salt and black pepper. Serve as a lunch, with crusty bread, or serve alongside a beef main course for dinner.


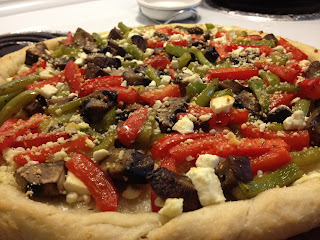
Portobello, Red Pepper & Goat Cheese Pizza


I made my first homemade pizza about six months ago (see Eggplant Parmesan Pizza), and loved it so much that I have made several pizzas since then. I have experimented some with other various ingredients, but this pizza in particular is the best pizza I have ever made, according to my husband! It was so delicious!

This recipe is in one of my cookbooks and I have passed over it so many times. I like my tomato sauce on my pizzas, so I really branched out with this pizza since there is no sauce on it. I'm so happy I decided to make it! I just can't get over how incredible the flavor was! The recipe is actually meant for the grill, but I ended up making mine inside. I will list the recipe below how it is in the cookbook for the grill, but here is how I made mine:

First, I made the dough. I got this recipe from my BFF Sara back when I made my first pizza six months ago, and instantly fell in love with this dough recipe! Some of the best pizza dough I've ever had! And it is so easy to fix. It is WELL worth it to make your own dough using this recipe over just buying a package of refrigerated pizza crust. You can view the dough recipe on Sara's blog by clicking here. After you finish rolling the dough out, you can either roll the edges over to create a raised crust, like I did, or you can just leave it flat so you have more of a thin-crust pizza. Bake the crust at 475° for 5 minutes. After those 5 minutes and you pull the crust out, reduce heat to 425°.

While the crust was in the oven, I chopped up the mushrooms and peppers. The recipe just calls for a red bell pepper, but I also had a green bell pepper that I ended up not using earlier in the week, so I decided to use both the red and green bell peppers. Next, I sauteed the mushrooms and peppers in a little olive oil. (This was instead of grilling the vegetables.) I also mixed together the vinaigrette. After I pulled the crust out of the oven, I brushed the crust with the vinaigrette and sprinkled the cheese on top and put it back in the oven for about 2 minutes. Crumbled feta can be substituted for the crumbled goat cheese.

Next, I added the mushrooms and bell peppers to the pizza and brushed the vegetables slightly with the vinaigrette and sprinkled a little more cheese on top. I then baked the pizza at 425° for about 14 minutes, or until the crust starts to get a nice, golden brown. After it finished baking, I drizzled a little more vinaigrette over the top.

So that is how I made it and it was simply amazing! My mouth is watering just thinking about how yummy it was. You can also follow the recipe below and try it on the grill! I know I will definitely make sure to do that in the future! This pizza was too delicious to not make again soon! Enjoy!

Portobello, Red Pepper & Goat Cheese Pizza
Pampered Chef Quick Vegetarian Main Dishes
Published by The Pampered Chef, Ltd. in 2010.

Total time: 30 minutes  Yield: 4 servings

Vinaigrette
1/4 cup Garlic Oil or olive oil
2 tbsp red wine vinegar
2 garlic cloves, pressed
1 tsp finely chopped fresh thyme leaves
1/2 tsp salt
1/4 tsp coarsely ground black pepper

Pizza
12 oz portobello mushrooms (about 6 medium)
1 medium red bell pepper
1 10-oz prebaked thin pizza crust
1 pkg crumbled goat cheese, divided

1. Prepare grill for direct cooking over medium-high heat. For vinaigrette, whisk together ingredients in Small Batter Bowl. Reserve 2 tbsp in (1-cup) Prep Bowl for serving.
2. For pizza, remove stems from mushrooms with Paring Knife. Cut bell pepper in half; remove stem and seeds. Brush both sides of  pizza crust with vinaigrette. Grill vegetables, covered, 8-9 minutes or until tender, turning and brushing occasionally with vinaigrette using BBQ Basting Brush. Remove vegetables from grill using BBQ Tongs.
3. Place pizza crust top side down onto grid of grill. Grill, covered, 1-2 minutes or until slightly browned and crisp. Turn crust over with BBQ Turner; stop with goat cheese, reserving 1 tbsp for garnish. Grill an additional 1-2 minutes or until bottom of crust is browned and crisp. (Cheese with soften but not appear melted.) Remove crust from grill.
4. Slice bell pepper into thin strips and mushrooms on a bias using Santoku Knife. Arrange mushrooms and bell pepper over crust. Drizzle reserved vinaigrette evenly over top. Sprinkle with reserved goat cheese, if desired.

Wednesday, April 25, 2012

Homemade Chicken Soup


A few days ago I made Roasted Chicken with Herbs. I have roasted a whole chicken a few other times before, but I have always just thrown away the chicken carcass. This time, however, I decided to use the carcass to make homemade chicken soup. I'm so happy I did! It was terrific!

It was very easy to fix, but does take some time. It might be better to fix this on the weekend or a day when you'll be home. I work from home, so I was able to get everything going on my lunch break and could check on it a few times throughout the afternoon as it simmered. You need to let the soup simmer for at least four hours. Our house smelled SO good all afternoon! It was such a tease! And the soup tasted just as good as it smelled. I was a little surprised at how much meat came off of the bones! There was a lot of meat in the soup! The spices I picked out were perfect too.

I'm very happy with how it all turned out! I'm usually not much of a soup person, but this was very good! I also love the fact that we've gotten so many meals out of that one chicken! I mentioned in the post a few days ago that we got a 5.43 pound chicken for only $5.38. With that $5.38, we have already had two dinners with the chicken (and still have some leftovers) and then tonight we had a third dinner with the soup and still have a lot of soup leftover! It is such a great deal to buy a whole chicken. You can't beat it! You can get so many meals out of it for so little money!

In the list of ingredients, I just listed what vegetables and spices I used without any measurements. I didn't measure anything, I just added until I thought it looked good! I added some spices at the beginning, and then  as the soup simmered I would sample a little taste and try adding some of one or more of the spices and continued on like that. How are you going to know if your dish is good or needs anything if you don't do taste tests!

You can definitely use your imagination with this one. Add whatever vegetables or spices or whatever you want! Let me know how you decide to make it and how it turned out for you! Enjoy!

Homemade Chicken Soup

chicken carcass from Roasted Chicken and Herbs
celery
carrots
onion
bay leaf
basil
rosemary
thyme
salt
pepper
noodles

1. Add the carcass to a large pot and fill it with water until the carcass is covered. Add remaining ingredients to pot and let simmer for about 4 hours.
2. Periodically check on the soup. Add more spices as desired. As the water reduces, you may need to add more water to the pot to keep the carcass covered.
3. After about 4 hours you will notice the meat has started falling off the bones and the carcass has started to break apart. Remove bones. Some pieces will be large and easy to pick out, but you will also need to carefully look for pieces of chicken that still have smaller bones attached. I used a slotted spoon and spent about 30 minutes getting spoonfuls of chicken and picking little bones out of the meat.
4. Cook noodles, drain, and add to soup. Enjoy!

Sunday, April 22, 2012

Roasted Chicken with Herbs

"Find something you're passionate about and keep tremendously interested in it." - Julia Child

Fixing this meal today got me in the mood to watch Julie & Julia. That is such a good movie! I love Julia Child. Such an incredible woman. I've also been reading through her book, My Life in France. Such an interesting read! I love to cook so much, but sometimes I get caught up in everyday things and don't enjoy cooking as much as I know I truly do. But reading parts of her book (or watching that movie) always re-sparks that passion that I know lies within me. As simple as this meal was, I had a lot of fun fixing it!


I don't know why I don't cook a whole chicken more often. I got a 5.43 pound chicken for $5.38! $5.38!!! For $5.38, the two of us can get at least two dinners out of the chicken, PLUS chicken soup or stock from the carcass! It is such a good deal, I feel like a fool for not doing this more often! It is an excellent option to cook a delicious, inexpensive meal for your family, or can very easily be presented as an elegant dish for a dinner party!

Not only is it such an incredible deal to buy and cook a whole chicken, but it is SO DELICIOUS! Oh my this was quite a delectable treat! This is probably one of the simplest meals I've ever made. It takes very little to prepare the chicken, and then you just have to be patient while it roasts in the oven! The worst part is having your house fill up with the incredible smell of roasting chicken and listening to the crackle and pop of the juices as it cooks. I couldn't help but keep running to the kitchen to turn the oven light on to look at the chicken. I felt like a little kid on Christmas morning!

I followed the recipe just as it is listed, except I added one little thing. When I was dusting the chicken with salt and pepper just before it went in the oven, I also brushed the chicken with some olive oil. I mean, who are we kidding? Everything tastes better with a little olive oil. And boy was this chicken so good! The skin had just the right amount of crisp to it, the meat was incredibly juicy and tender, the flavor was superb!

I will definitely be using the carcass to make a chicken soup, and will post that recipe when I do it this week. I have roasted a whole chicken before and always threw away the carcass, but if I have access to the whole bird then I would like to use as much of it as possible. Keep an eye out for that post!

Roasted Chicken with Herbs
He Said Beer, She Said Wine: Impassioned Food Pairings to Debate and Enjoy
Published by DK Publishing in 2008.

1/4 cup unsalted butter (room temperature)
3-6 cloves garlic, peeled and chopped
1/2 cup chopped fresh basil
2 fresh rosemary springs, chopped
1 whole chicken (6-8 lbs)
Salt and pepper

1. Preheat oven to 350°F. In a medium-sized mixing bowl soften up the butter, and then blend in the garlic, basil, and rosemary. Set aside.
2. Rinse the chicken and wash your hands thoroughly. Using your fingers, gently find the separation between skin and breasts, and carefully lift the skin to access the breast meat. Do not tear or fully detach the skin.
3. With your fingers, spread the butter mixture under the skin, covering all accessible meat surfaces. Replace skin and dust the chicken with salt and pepper.
4. Bake the chicken for 20 minutes per pound (plus an additional 20 minutes), basting periodically, or until an internal temperature of the breast reaches 160°F, and the thigh reaches 170°F. Allow chicken to cool for about 10 minutes before carving and serving.

Thursday, April 19, 2012

Cajun Chicken Sandwiches


I took two pictures for you all so that you could see the chicken by itself, and also with a little shredded mozzarella melted on top.

If you like Bojangles chicken, then you will like this chicken sandwich! I'm not sure how far out my blog is reaching people, so if you aren't from the southeast and don't understand that reference then I apologize. I first apologize that you don't understand the reference, and I also apologize for the fact that you have not experienced the amazing yummy goodness that is Bojangles. Go to one asap! http://www.bojangles.com/locations

This Cajun Chicken Sandwich reminded both me and my husband of the Cajun Chicken sandwiches from Bojangles. Maybe we've discovered their secret spice recipe? Needless to say, this recipe was delicious! We ended up cooking the chicken on our George Foreman grill instead of the actual grill. It was still excellent, and I'm sure the added grill flavor would taste great if you cooked it on a charcoal grill!

After I mixed the spices together, I rubbed more of the spice mixture on my husband's piece of chicken than I did on mine. He loves spicy food, and he loved this chicken sandwich! I just rubbed a small amount of the spice mixture on my chicken, but the flavors sure did come through still! It had just the right amount of a kick for me!

This seasoning mixture can absolutely be used on more than just chicken. Try it out on pork or fish too! Ooo I bet it would be good to rub on some corn on the cob before putting the corn on the grill...

Enjoy!

Cajun Chicken Sandwiches
Taste of Home: Everyday Light Meals
Published by Reiman Media Group, LLC in 2010.

Prep: 10 minutes + marinating  Grill: 10 minutes  Yield: 6 servings

6 boneless skinless chicken breast halves (4 ounces each)
1 tablespoon olive oil
1/2 teaspoon celery salt
1/2 teaspoon garlic salt
1/2 teaspoon lemon-pepper seasoning
1/4 teaspoon cayenne pepper
1/4 teaspoon paprika
1/4 teaspoon pepper
6 kaiser rolls, split and toasted
12 slices tomato
6 lettuce leaves

1. Flatten chicken to 1/2-in. thickness. Brush both sides with oil. Combine the seasonings; rub over both sides of chicken. Arrange in a 13-in. x 9-in. x 2-in. baking dish. Cover and refrigerate for at least 2 hours or overnight.
2. Coat grill rack with nonstick cooking spray before starting the grill. Grill, covered, over medium heat for 3-5 minutes on each side or until chicken juices run clear. Serve on rolls with tomato and lettuce.

Monday, April 16, 2012

Rosemary and Garlic Roasted Salmon


If you're looking for a quick, healthy, scrumptious meal, then look no further! It was a very simple meal, but full of flavor! This salmon was just incredible. The few ingredients that were spread on top of the fish complimented the flavor of the salmon perfectly.

This recipe is very straightforward. There really isn't much to it! We fixed some brown rice and peas/corn to go with the salmon. As I mentioned already - quick, healthy, and scrumptious! You'll definitely want to make sure to make a point to fix this recipe at some point!

Rosemary and Garlic Roasted Salmon
http://www.ahintofhoney.com/2011/03/rosemary-and-garlic-roasted-salmon.html

Prep time: 5 minutes  Cook time: 8-10 minutes  Yield: 2 servings

2 6-oz. salmon fillets
1 tsp extra virgin olive oil
1 tsp fresh rosemary, chopped
1 large clove garlic, minced
salt and freshly ground black pepper

1. Preheat over to 425°F. Line a baking sheet with aluminum foil and lightly grease with cooking spray.
2. In a small bowl, combine the olive oil, rosemary, and garlic to form a paste.
3. Place salmon on the prepared baking sheet. Sprinkle with salt and pepper. Rub the garlic-herb mixture over the surface of the salmon fillets.
4. Roast in preheated oven for 8-10 minutes, until the fish flakes easily with a fork.

Sunday, April 15, 2012

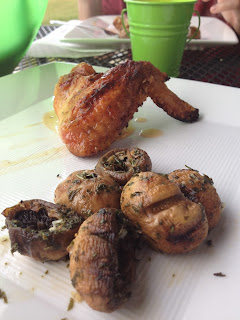
Lemon Garlic Mushrooms


I know this is the 3rd recipe in a row I've posted for the grill, but the weather has just so perfect! It has been too nice outside NOT to be grilling!!

These mushrooms were very appetizing! I was quite happy with how they turned out. They were incredibly  juicy and had such a great flavor to them! The lemon juice seemed to really soak through the mushrooms while on the grill and provided a terrific flavor when you took a bite. Yum! The olive oil, garlic and parsley also all blended together really well and mixed with the lemon juice paired wonderfully with the mushrooms! Delicious!

It was the perfect side to have with our wings that we grilled for dinner tonight. My husband and I are big fans of grilling wings. You can get a package of 6 wings at Food Lion, which is the perfect amount for the two of us, and all we do is sprinkle some Season All Seasoned Salt before they go on the grill, and then dunk them in George's Barbecue Sauce after they come off the grill! For those of you that have never had George's before, you are missing out!


I could seriously just drink this stuff straight out of the bottle. It is so good! It is a NC based company though, so those of you that don't live in NC, you'll have to order your bottle online, but it is so worth it!

Anyways, back to the mushrooms... one thing I really liked about the mushrooms (besides the fact that they were amazing), was that it was a light, healthy side that didn't leave you feeling uncomfortably full after dinner. We've been known in the past to make tater tots and Texas Toast to go with our wings, but we would always be really stuffed afterward. These mushrooms went really well with the chicken, and we felt satisfied at the end of the meal without feeling super full!


A perfect end to the weekend - beautiful weather and a delicious dinner on the back porch! Enjoy!

Lemon Garlic Mushrooms
Taste of Home: Backyard Grilling
Published by Reiman Media Group, Inc. in 2006.

Prep time: 5 minutes  Grill time: 10 minutes  Yield: 4 servings

1/4 cup lemon juice
3 tablespoons minced fresh parsley
2 tablespoons olive oil
3 garlic cloves, minced
Pepper to taste
1 pound large fresh mushrooms

1. In a small bowl, combine the first five ingredients; set aside. Grill mushrooms using skewers or a grill basket, covered, over medium-hot heat for 5 minutes. Brush generously with lemon mixture. Turn mushrooms; grill 5-8 minutes longer or until tender. Brush with remaining lemon mixture before serving.

Saturday, April 14, 2012

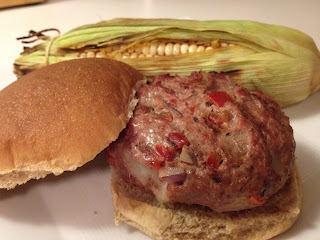
Provolone Pepper Burgers


My last post was about the Grilled Sweet Corn, which you can see in the above picture with the amazing burgers that we also fixed!

I have only fixed my own burgers a few times. The first time I made my own burgers, it was a pretty terrible disaster and they ended up falling apart on the grill. It was so sad! That was a few years ago. I now have this fear of my burgers falling apart on the grill every time I make my own patties. BUT, last night was a success! Just follow the recipe and you'll be good to go!

These burgers were very tasty! I loved the cubes of provolone cheese in the burger. YUM! Next time, I will probably not put as much onion into the mixture though. I felt like the onion flavor was a little much, and took away from the flavor of the roasted red peppers. Still a tasty burger!

A note from the cookbook: Use a 1/2-cup measuring cup or ice cream scoop to make equal size patties. Gently form each portion into a patty. For moist, light-textured burgers, don't overmix or overhandle the meat mixture.

Enjoy!

Provolone Pepper Burgers
Taste of Home: Backyard Grilling
Published by Reiman Media Group, Inc. in 2006.

Prep time: 10 minutes  Grill time: 10 minutes  Yield: 4 servings

1/3 cup finely cubed provolone cheese
1/4 cup diced roasted red peppers
1/4 cup finely chopped onion
Salt and pepper to taste
1 pound ground beef
4 hamburger buns, split

1. In a bowl, combine the cheese, red peppers, onion, salt and pepper. Add beef and mix well. Shape into four patties. Grill, covered, over medium-hot heat for 4-5 minutes on each side or until meat is no longer pink. Serve on buns.

Grilled Sweet Corn


I've mentioned before how much I love to grill out. I could have stood for it to be a little warmer yesterday, but it was still a perfect night for grilling! We have never grilled corn before, but not only was it easier than I thought it was going to be, but it was also SO good!!

I was going to just grill plain corn, but then I found this recipe in one of my cookbooks and thought it looked too good not to try! It was very simple to put together. All I had to do was mix together the softened butter, parsley, chili powder, garlic salt and ground cumin and spread it over the corn and then wrap them back up. What a delicious combination of flavors! Those spices really brought out a flavor in the corn that I've never had before. It was delicious!

You have a good five months ahead of you of perfect grilling weather - make sure to try this corn out at some point! An excellent alternative to french fries or chips or anything like that for your cookout! You won't be disappointed!

Grilled Sweet Corn
Taste of Home: Backyard Grilling
Published by Reiman Media Group, Inc. in 2006.

Prep + Soak time: 25-30 minutes  Grill time: 10-15 minutes  Yield: 8 servings

8 large ears sweet corn in husks
6 tablespoons butter, softened
1 tablespoon minced fresh parsley
1 to 2 teaspoons chili powder
1 teaspoon garlic salt
1/2 to 1 teaspoon ground cumin

1. Carefully peel back husks from corn to within 1 in. of bottom; remove silk. Combine remaining ingredients; spread over corn. Rewrap corn in husks and secure with string. Place in a large kettle; cover with cold water. Soak for 20 minutes; drain.
2. Grill the corn, covered, over medium heat for 10-15 minutes or until tender, turning frequently.

Thursday, April 12, 2012

Chicken Marsala


This recipe tasted a lot better than I thought it was going to! I'm not sure why I had my doubts, but I was pleasantly surprised when I took the first bite! It was delicious!

The chicken was cooked perfectly - very moist. The seasoning mixture that was sprinkled on the chicken was excellent! The flavors really came though and tasted great! The seasoning even left a slight burn in the back of my throat - good stuff! The chicken broth and wine also added a lot of flavor to everything. I ended up getting a Cabernet Sauvignon rather than a Marsala wine, but I thought it tasted terrific! A glass of Cabernet also paired exceptionally well with the chicken at dinner.

This recipe was very simple to fix and full of flavor! My husband and I both really enjoyed it a lot! This one is definitely a must try!

Chicken Marsala
Taste of Home: Everyday Light Meals
Published by Reiman Media Group, LLC in 2010.

Prep time: 25 minutes + marinating  Bake: 25 minutes  Yield: 6 servings

6 boneless skinless chicken breast halves (4 ounces each)
1 cup fat-free Italian salad dressing
1 tablespoon all-purpose flour
1 teaspoon Italian seasoning
1/2 teaspoon garlic powder
1/4 teaspoon paprika
1/4 teaspoon pepper
2 tablespoons olive oil, divided
1 tablespoon butter
1/2 cup reduced-sodium chicken broth
1/2 cup Marsala wine or 3 tablespoons unsweetened apple juice plus 5 tablespoons additional reduced-sodium chicken broth
1 pound sliced fresh mushrooms
1/2 cup minced fresh parsley

1. Flatten chicken to 1/2-in. thickness. Place in a large resealable plastic bag; add salad dressing. Seal bag and turn to coat; refrigerate for 8 hours or overnight.
2. Drain and discard marinade. Combine he flour, Italian seasoning, garlic powder, paprika and pepper; sprinkle over both sides of chicken. In a large nonstick skillet coated with nonstick cooking spray, cook chicken in 1 tablespoon oil and butter for 2 minutes on each side or until browned. Transfer to a 13-in. x 9-in. x 2-in. baking dish coated with nonstick cooking spray.
3. Gradually add broth and wine or apple juice mixture to skillet, stirring to loosen browned bits. Bring to a boil; cook and stir for 2 minutes. Strain sauce; set aside. In the same skillet, cook mushrooms in remaining oil for 2 minutes; drain. Stir sauce into mushrooms; heat through. Pour over chicken; sprinkle with parsley. Bake, uncovered, at 350° for 25-30 minutes or until chicken juices run clear.

Tuesday, April 10, 2012

Tropical Shrimp


Oh yes, this was wonderfully delicious! I found a recipe on Pinterest for Cilantro Lime Shrimp and adapted it and made it into something even better!

Our friends in Richmond made a very delicious fresh salsa last weekend which I incorporated into this recipe. This dinner was so good! It was very refreshing. The various flavors all blended together quite nicely and paired perfectly with the shrimp! A very yummy, healthy meal! Enjoy!

Tropical Shrimp

Total time: 30 minutes  Yield: 4 servings

2 lbs shrimp, shelled and deveined
1 tbsp olive oil
1 red pepper, diced
1 jalapeno pepper, diced
1 red onion, diced
1 8oz can crushed pineapple, drained
1/3 cup plus a pinch chopped fresh cilantro
1 lime
1 cup brown rice
salt and pepper to taste

1. Cook rice according to package directions.
2. Meanwhile, heat olive oil in saute pan over medium heat. Sprinkle shrimp with salt and pepper. Add shrimp, red pepper, jalapeno pepper, and red onion to saute pan and cook until shrimp is pink and cooked through and vegetables are tender. Mix in pineapple and cilantro.
3. When rice is finished cooking, mix into the shrimp mixture. Squeeze lime juice over everything and mix well.
4. Serve with a lime wedge and a sprinkle of cilantro if desired.

Monday, April 9, 2012

Florentine Shells

This is a very special blog post for me! One of my very best friends had her first baby 19 days ago! Hooray! Caroline lives a few hours away, but last week I was able to get out of town for a few days so that I could go spend some time with her and meet little Dudley! I had such a wonderful visit! I really loved getting to spend some time with Caroline and Bob and I was super excited to meet Dudley and hold him! (I even got to rock him to sleep which was very special for me!) :-) He is so cute!! I wanted to be able to help out some, so I thought that one thing I could do was cook a few dinners for Caroline and Bob!

Here is a picture of my beautiful friend and the new little man in her life!


And here is a picture of Zuzu, my helper in the kitchen for a few days!


I have made this dish before and really liked it, but I had to alter the recipe some this time. The recipe has you mix together this stuffing mixture and then stuff it into jumbo pasta shells. However, when I went to the store, they were out of the jumbo pasta shells, and they also didn't have any other type of large stuffing shell. So, I got some small shells and rather than make stuffed pasta shells, I decided to make "unstuffed" pasta shells! I think it worked out well!


I will explain here what I did, but then the original recipe will be listed below as usual for you to use if you'd like! As I mentioned, I got the small shells, and as they cooked, I mixed together the ricotta cheese, spinach, Italian cheese blend, half-and-half, Parmesan cheese, garlic and seasonings together. Once the pasta shells finished cooking and I drained the water, I mixed the stuffing mixture in with the shells. I also whisked together the spaghetti sauce and half-and-half and heat that up on the stove while I was preparing everything else. After I mixed the stuffing mixture and shells together, I poured the sauce in with everything and mixed it all up really well!

Not quite how the recipe has you do it, but I thought it worked out well! The way I did it also didn't take nearly as much time to prepare as the original recipe, so that is good for if you need a quick meal. This dinner has a wonderful, creamy blend of flavors to it. I would consider this a classic Italian meal, that went perfectly with a garden salad and some garlic bread! A pretty tasty meal! Enjoy!

Dudley, once you get old enough to eat regular food, I'll make this again for you! ;-)

Florentine Shells
Pampered Chef: Main Dishes
Published by The Pampered Chef, Ltd. in 2000.

Prep time: 40 minutes  Cook time: 45 minutes  Yield: 6 servings

18 uncooked jumbo pasta shells
1 container (15 ounces) part-skim ricotta cheese
1 package (10 ounces) frozen chopped spinach, thawed, drained and squeezed dry
2 cups (8 ounces) shredded Italian cheese blend, divided
3/4 cup half-and-half, divided
1 ounce fresh Parmesan cheese, grated (about 1/4 cup)
1 garlic clove, pressed
1/2 teaspoon dried basil leaves
1/2 teaspoon dried oregano leaves
1/8 teaspoon salt
1 jar (26-28 ounces) spaghetti sauce

1. Preheat oven to 350°F. Cook pasta shells according to package directions; drain.
2. Meanwhile, in Classic Batter Bowl, combine ricotta cheese, spinach 1 1/2 cups of the Italian cheese blend and 1/4 cup of the half-and-half. Grate Parmesan cheese into Batter Bowl using Deluxe Cheese Grater. Press garlic into Bowl using Garlic Press. Add seasonings; mix well and set aside.
3. In Small Batter Bowl, whisk spaghetti sauce and remaining 1/2 cup half-and-half with Stainless Steel Whisk until blended. Reserve 1 cup of the sauce mixture; spread remaining sauce mixture over bottom of Rectangular Baker. Using Medium Scoop, fill each shell with rounded scoop of spinach mixture. Arrange filled shells in Baker. Top evenly with reserved sauce mixture. Cover Baker with Rectangular Lid/Bowl.
4. Bake, covered, 40 minutes. Remove Lid/Bowl. Sprinkle shells with remaining 1/2 cup Italian cheese blend. Continue baking, uncovered, 5 minutes or until cheese is melted. Remove from oven; let stand 10 minutes.

Tuesday, April 3, 2012

Chicken Pie


Before I began my food blog and started trying out tons and tons of new recipes, this dinner was something my husband and I had all the time! I forget how amazingly delicious it is until I have it again. This is a favorite in our house!

My mother-in-law used to be a Pampered Chef consultant. She told me one time that this is a Pampered Chef recipe that she got at a show that she did, but has never been able to find it in any of the Pampered Chef cookbooks! My husband made it for me when we first started dating and it has been a staple in our house every since! You can alter the recipe in different ways to make it just how you like it. Instead of a can of peas, we used to use a can of Veg-All. My mother-in-law will often use turkey instead of chicken. I've even tried using Cream of Mushroom soup before!

This is SUCH a delicious dinner - definitely one of our favorites! You can't go wrong with Chicken Pie!!

Chicken Pie
Prep time: 10 minutes  Bake time: 45 minutes  Yield: 6-8 servings

2 cups chicken, cooked and chopped
1 package pie crust
1 can cream of chicken soup
1 can cream of potato soup
1 can peas, drained
salt and black pepper to taste

1. Preheat oven to 375°F. Roll out one pie crust and lay in pie pan, stretching across the bottom and up the sides. In a bowl, combine chicken, cream of chicken soup, cream of potato soup, peas, salt, and black pepper; mix well. Pour into pie pan. Roll out second pie crust and lay over the top of the filled pie pan, sealing the edges. Cut a slit to vent. Bake for 40-45 minutes, or until golden brown.

Monday, April 2, 2012

Italian Sausage 'n' Peppers Supper


Mmm Mmm Mmm! This recipe was quite delicious!

My husband and I started an 8 week outdoor fitness boot camp through the gym. The class meets from 6pm-7pm, so over the next 8 weeks I will be focusing on recipes that either take little time to prepare or can be prepared in advance so that it isn't 8pm by the time we're sitting down for dinner!!

This was a wonderfully simple, healthy and delicious dinner! I cut even more time off by purchasing the Butterball Turkey Smoked Sausage that comes already cooked, so all I had to do was heat it up and toss it in with the vegetables! What great flavor! The combination of the sausage and peppers and the different spices was very tasty! One thing I really liked about this meal was that it left us feeling satisfied without that stuffed, full feeling.

The recipe calls for penne pasta, but we already had some shells in the cabinet, so I just used those. The cookbook says that you can substitute the basil, oregano and thyme with 1-1/2 teaspoons of Italian seasoning, and that if you want to add some kick to the dish, add some crushed red pepper flakes of cayenne pepper. Enjoy!

Italian Sausage 'n' Peppers Supper
Taste of Home: Everyday Light Meals
Published by Reiman Media Group, LLC in 2010.

Prep/Total time: 30 minutes  Yield: 5 servings

2 cups uncooked penne pasta
1 pound turkey Italian sausage links
1/2 cup each julienned sweet red, yellow, and green pepper
1 tablespoon minced fresh basil or 1 teaspoon dried basil
3 garlic cloves, minced
1/4 teaspoon dried oregano
1/4 teaspoon dried thyme
1/4 teaspoon caraway seeds
1 tablespoon olive oil
2 cans (14-1/2 ounces each) diced tomatoes, drained

1. Cook pasta according to package directions. In a large nonstick skillet, brown sausage over medium heat; drain. Cut sausage into 1/4-in. slices. In the same skillet, saute the peppers, basil, garlic, oregano, thyme, caraway seeds and sliced sausage in oil until peppers are crisp-tender. Stir in tomatoes. Cook and stir until heated through. Drain pasta; add to skillet and mix well.