Wednesday, October 26, 2011

Cajun Shrimp with Smoked Gouda Grits


OH. MY. GOODNESS. Have you ever had smoked Gouda before? If your answer is no, then you need to go get in your car and drive to your nearest grocery store and get some. Go! Now! Now! Now!

You don't really have to do that... but you are missing out! I have a little bit of an obsession with cheese. I love it. So much. I could probably live off of all the various types of cheeses and that's it. Sigh... if only. So, you now know some about my love of cheese. I also love things that are smoked. I had never had smoked Gouda before I bought some for this recipe. OH. MY. GOODNESS!! As I said in a conversation the other day, this is what heaven must be like. I have struggled to keep myself from eating all of the smoked Gouda before it was time to cook the recipe tonight!

Anyways...

This recipe was really delicious! It hardly took any time to put together also. It is awesome that something so amazing can be made so easily and so quickly! The grits were pretty amazing. I have never heard of making grits with chicken broth, but it added a lot of flavor! Also, not to mention, adding the smoked Gouda to the grits made them beyond delicious. The cookbook says that smoked cheddar or smoked Provolone would also work well in this recipe. Also, the cookbook says that quick, instant and regular grits have different cooking times and that quick grits are best for this recipe.

The shrimp mixture was also very delicious! I thought that it had just the right kick to it. My husband, who has had more experience with shrimp & grits dishes, felt like there was some kind of spice missing (but he still loved this dish!). Put all of the pieces together and you have yourself quite a yummy meal! You can guarantee I will be making this recipe again!! (And not just as an excuse to buy more smoked Gouda) :-)

Cajun Shrimp with Smoked Gouda Grits
Pampered Chef 29 Minutes to Dinner, Volume 2
Published by The Pampered Chef, Ltd. in 2009.

Total time: 21 minutes  Yield: 6 servings

Grits
3 cups 33% reduced-sodium chicken broth
1/2 cup heavy whipping cream
1 cup uncooked quick grits
4 oz smoked Gouda cheese

Shrimp
1 tsp vegetable oil
1 medium green bell pepper
3 garlic cloves, pressed
1 tbsp Cajun seasoning
1 can (14.5 oz) diced tomatoes with green pepper, celery and onion (1 3/4 cups)
1 can (15 oz) tomato puree (about 1 3/4 cups)
1 1/2 lb large cooked shrimp (31-35 per lb), peeled and deveined
1/3 cup snipped fresh parsley (optional)

1. Place broth and cream in Large Micro-Cooker. Microwave, covered, on high 3-5 minutes or until hot. Add grits; cover and microwave on high 4-5 minutes or until thickened. Grate cheese into grits with Rotary Grater; stir until cheese is melted.
2. Heat oil in (10-in.) Skillet over medium-high heat 1-3 minutes or until shimmering. Using Santoku Knife, dice bell pepper. Add bell pepper, pressed garlic and seasoning to Skillet. Cook 2-3 minutes or until bell pepper is tender. Add tomatoes, puree and shrimp; cook 1-2 minutes or until heated through.
3. Remove Skillet from heat. Divide grits among serving plates; top with shrimp mixture. Garnish with snipped fresh parsley, if desired.

Labels:

Pork Chops with Sweet Potato Puree & Black Bean Sauce


This dish had a great flavor to it! I thought it tasted a little more Mexican than Latin (it is from the Pampered Chef Latin Flavor cookbook), but also I haven't had much experience with Latin food. The sauce was delicious! The recipe calls for prepared recaito, which according to the cookbook is "a cooking base that usually consists of onion, garlic, olive oil, peppers and green herbs. It is used to season soups, stews, beans and rice." I couldn't find any recaito, but I did find sofrito (by Goya) in Harris Teeter. The description on the bottle is almost exactly the same as what the cookbook says recaito is. It really added a lot to the dish!

The sweet potato puree was so yummy! And the flavor of the sweet potato paired really well with the flavor of the sauce. The puree calls for crema agria, but you can substitute that with sour cream, which is what I did.

Overall, the recipe didn't take too much effort to put together and it was really tasty! It yields 6 servings, so I just cut everything down to make only 2 servings. The sauce KIND of reminded me of the sauce packets you get at Taco Bell, but it tasted better than that! All of the parts of the dish paired really well together! And I imagine you could use chicken if you didn't want to use pork chops. I bet that would be quite delicious!

Pork Chops with Sweet Potato Puree & Black Bean Sauce
Pampered Chef Latin Flavor
Published by The Pampered Chef, Ltd. in 2008.

Prep time: 17 minutes  Total time: 35 minutes  Yield: 6 servings

Puree
1 1/2 lbs sweet potatoes, peeled
4 cups water
2 tsp salt
1/3 cup crema agria
2 tbsp buter

Pork and Sauce
1 tbsp vegetable oil
6 boneless pork loin chops, cut 1/2-3/4 in. thick (4-6 oz each)
Sat and coarsely ground black pepper
3 garlic cloves, pressed
1 tbsp butter
1 tsp ground cumin
3/4 cup chicken broth
1 can (15 oz) black beans, drained and rinsed, divided
1/3 cup prepared recaito
1/4 cup coarsely chopped fresh cilantro

1. For puree, cut potatoes into 1/4-in. slices. Place potatoes, water and salt into Large Micro-Cooker. Microwave, covered, on high 14-16 minutes or until tender; drain. Cool 2 minutes. Add crema and butter; mix well. Cover; microwave 1-3 minutes or until hot.
2. For pork, in (12-in.) Skillet, heat oil over medium-high heat 1-3 minutes or until shimmering. Season pork with salt and pepper. Cook pork 8-10 minutes or until internal temperature registers 155°F, turning once. Set pork aside; tent with foil (temperature will rise to 160°F).
3. For sauce, cook garlic, butter and cumin in (1.5-qt.) Saucepan over medium heat 3-4 minutes or until fragrant. Add broth; simmer 2 minutes. In blender, blend broth mixture, 3/4 cup of the beans and recaito until smooth. Press sauce through Strainer into Small Batter Bowl. Serve pork with puree, sauce, remaining beans and cilantro.

Labels:

Friday, October 21, 2011

Roasted Pumpkin Seeds

I would say that my first attempt at roasting pumpkin seeds was a success! I have carved a pumpkin for Halloween every year for as long as I can remember. That's a lot of pumpkins. I have always just thrown the seeds away along with all the rest of the yucky insides of the pumpkin, but this year I decided to try something different! Our gerbils LOVE the pumpkin seeds that come in their food. They must be good! This is one of them, Cosmo:


We also have Morty and Frank. In the past we have had Jerry and George. (Yes, we love the show Seinfeld.)

ANYWAYS... I immediately went to my friend Sara (who I mentioned in a recent post - her blog site is http://messingwithtexas.wordpress.com/), because I thought that roasted pumpkin seeds seemed like something she would have done before. She led me to this Food Network webpage. I decided to try tossing half of my seeds in olive oil and salt, and half of my seeds in cinnamon and sugar. The results:


Ohhhh my goodness they are delicious! I am happy with the choices I made because I have both salty and sweet. There are some other great suggestions on that website! Plus it was very easy. Again, here is where I got the recipe: http://www.foodnetwork.com/recipes/food-network-kitchens/pumpkin-seeds-recipe/index.html

In case you were wondering, this is the pumpkin that I carved and got my seeds from:


Happy Halloween! Enjoy your roasted pumpkin seeds!

Labels:

Thursday, October 20, 2011

Chiles Rellenos Chicken


A quick post tonight, although there isn't really a whole lot to post about this recipe! It was very delicious, and I will definitely make it again. The chip crust gave it a nice little crunch, while the green chiles provided a lot of flavor! We also had it with some salsa, which was really good. It was very tasty, and the recipe was very easy to follow and prepare. We needed a quick meal tonight, so this was perfect. Easy, full of flavor, and didn't take much time to put together! Enjoy!

Chiles Rellenos Chicken
Pampered Chef Stoneware Inspirations
Published by The Pampered Chef, Ltd. in 2005.

Prep time: 15 minutes  Bake Time: 22-25 minutes  Yield: 2 servings

2 boneless, skinless chicken breast halves (4-6 ounces each)
1 lime, cut in half crosswise
1 egg white
1 garlic clove, pressed
1/2 cup finely crushed nacho cheese flavored tortilla chips (about 1 1/2 cups chips)
1/2 can (4 ounces) whole green chiles, drained and cut into strips
2 tbsp shredded Monterey Jack cheese
1 tsp snipped fresh cilantro
Prepared salsa (optional)

1. Preheat oven to 400°F. Spray Small Bar Pan with nonstick cooking spray. Rinse chicken and pat dry with paper towels. Place one chicken breast half in resealable plastic food storage bag; seal bad. Lightly flatten chicken to even thickness using flat side of Meat Tenderizer. Repeat with remaining chicken breast half. Discard plastic bag.
2. Juice lime halves into Small Batter Bowl using Citrus Press. Add egg white and garlic pressed with Garlic Press; whisk until frothy using Stainless Whisk.
3. Place tortilla chips in another resealable plastic food storage bag and finely crush using flat side of Meat Tenderizer. Place crushed chips in shallow dish. Dip chicken breasts into egg mixture and then into chips, coating completely. Discard any remaining crushed chips. Place chicken on pan.
4. Bake 20-22 minutes or until chicken is no longer pink and juices run clear. Arrange chile strips over chicken; sprinkle with cheese. Bake 2-3 minutes or just until cheese melts. Remove from oven. Sprinkle with cilantro. Serve with salsa, if desired.

Labels:

Monday, October 17, 2011

Eggplant Parmesan Pizza

I think I've got Domino's beat with this one...


This pizza turned out SO great!! The dough was quite delicious. The recipe calls for the use of refrigerated prepared pizza dough, but I decided to make my dough from scratch -


I used to think that it was crazy to have a pizza without any meat on it, but I'll take this Eggplant Parmesan Pizza any day!


Ok, first let's start with the dough. As I said, the recipe calls for refrigerated prepared pizza dough. Lately, I have been preferring to make things from scratch (example: Create-a-Cookie). My good friend Sara has similar feelings, and posted this great pizza dough recipe on her blog a few weeks ago. (She has a pretty fantastic blog, by the way! Along with entertaining and witty stories each day, she makes food related posts on Fridays! http://messingwithtexas.wordpress.com/)

Here is the link to her blog post where she posted the recipe for this pizza dough that I used tonight: http://messingwithtexas.wordpress.com/2011/09/23/margherita-pizza/

You can just follow the Pampered Chef recipe and use refrigerated prepared pizza dough, but this made from scratch recipe makes INCREDIBLE pizza dough!! It really added so much to my pizza tonight! She did tell me to do things just slightly differently tonight from what she posted in her blog. When I got the dough out of the refrigerator tonight, I rolled it into a ball and let it sit for 15 minutes. Then I flattened it out, and let it sit again for 15 minutes. I then flattened it out, and let it sit for another 15 minutes. I'm pretty sure it was after those 3 sets of 15 minutes, the dough was where I wanted it. You can always repeat the flattening and letting it sit for 15 minutes however many times you need/like.

Aside from the fantastic pizza dough, all of the other parts of the pizza were amazing as well! The sauce had so much flavor to it! In the cookbook, it says that "the homemade sauce on this pizza tastes much better than canned varieties and is worth the extra effort." I couldn't have said it better myself! It was just packed with flavor. You can't even compare it to a can of pizza sauce.

Now, the eggplant! I was very, very pleasantly surprised! The only time I have ever had eggplant was in a cooking class I took 5 years ago in college when we made a Parmesan Eggplant dish. I don't remember being very impressed, because I have never eaten or cooked with eggplant since then. It was so delicious on this pizza! Really added a LOT of flavor to the pizza. I am normally a Pepperoni Pizza kind of girl, but I loved the eggplant! From now on, any time I make pizza, I think that this is going to be the recipe that I will always go to.

A few notes that I just remembered - if you use the from-scratch dough, then once you have your dough spread/flattened out, bake the dough for 5 minutes at 475°F. Then, turn the oven down to 425°F to follow the baking instructions that the Pampered Chef recipe lists after you put the toppings on the pizza. Also, another thing I did different was cut my eggplant slices into quarters after I cooked them but before I put them on the pizza. The slices were a little big, and having them more cut up made the pizza easier to eat, I think.

Incredibly delicious pizza! You will be happy that you made this instead of ordering out!


Eggplant Parmesan Pizza
Pampered Chef The Vegetarian Table
Published by The Pampered Chef, Ltd. in 2011.

Prep time: 40 minutes  Total time: 55 minutes  Yield: 8 servings

4 tbsp olive oil, divided
4 garlic cloves, pressed
1 can (15 oz) tomato sauce
2 tsp sugar
1 tsp finely chopped fresh rosemary leaves
1/2 tsp coarsely ground black pepper
1 lb refrigerated prepared pizza dough
1 lb Japanese or Chinese eggplant (about 2 medium eggplants)
8 oz mozzarella cheese, shredded
1/2 oz Parmesan cheese, grated
1/2 cup chopped fresh basil leaves

1. Preheat oven to 425°F. For sauce, combine 1 tbsp of the oil and pressed garlic in (1.5-qt) Saucepan. Cook over medium heat 60-90 seconds or until fragrant. Add tomato sauce, sugar, rosemary and black pepper; bring to a simmer. Reduce heat to low; cook 5-7 minutes or until thickened. Remove Saucepan from heat; set aside.
2. Meanwhile, lightly brush Stoneware Cookie Sheet with 1 tbsp of the oil. Roll dough to edges of Cookie Sheet using Baker's Roller, stretching dough to cover bottom. Prick dough with pastry tool. Bake 18-20 minutes or until top of crust begins to brown.
3. Trim and discard ends of eggplants and slice into 1/2-in. disks using Chef's Knife. Heat remaining 2 tbsp oil in (12-in.) Skillet over medium heat 1-3 minutes or until shimmering. Cook eggplants 10-12 minutes or until browned, turning occasionally. Remove Skillet from heat.
4. Combine cheeses in Classic Batter Bowl; mix well. Spread 1 cup of the sauce over crust. Top evenly with eggplants and cheese mixture. Bake 14-16 minutes or until cheese begins to brown. Remove Cookie Sheet from oven to Stackable Cooling Rack; cool 5 minutes. Cut pizza into 16 pieces using Pizza Cutter; drizzle with remaining sauce and sprinkle with basil.

If you decide to make the from-scratch dough, just substitute any Pampered Chef directions about the dough with the recipe on Sara's blog until it is time to put the toppings on the pizza. Then follow the Pampered Chef directions about temperature and baking time for the dough. Also, refrigerate your eggplant after you buy it and use within a day or two or else it will become bitter. Enjoy!

Labels:

Thursday, October 13, 2011

Pan-Grilled Salmon with Poblanos, Corn & Onions

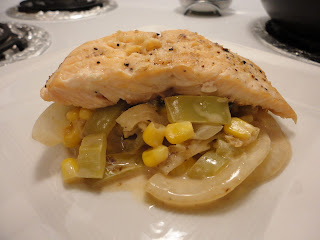
I mentioned earlier in the week that I recently got some new Pampered Chef cookbooks. Tonight I finally got around to trying a recipe out of the Latin Flavor cookbook! There are so many recipes that look so good, I had no idea where to start! We didn't have any fish planned yet for the week, so I decided on this salmon recipe. Excellent choice!


This recipe uses poblano peppers. Poblano peppers are more mild compared to jalapeno peppers, but after the horrible experience I had two nights ago (see: Zesty Ravioli Skillet) I didn't want to take any chances, so I bought some gloves to wear while I cut them up!


This dish was packed with flavor! This was my first experience with poblano peppers - they're really good! A slight kick, but not as overpowering as jalapeno peppers. (At least I personally think jalapenos have an overpowering flavor.) I don't have a Grill Pan/Press, so I actually cooked the pepper and salmon on our George Foreman grill, then did the rest of the cooking in a skillet on the stove. It all worked out really well! The salmon was delicious, especially paired with the poblano pepper and onion. It was also a very easy and quick (and healthy) dish to put together! Enjoy!


Pan-Grilled Salmon with Poblanos, Corn & Onions
Pampered Chef Latin Flavor
Published by The Pampered Chef, Ltd. in 2008.

Prep time: 11 minutes  Total time: 29 minutes  Yield: 6 servings

3 poblano peppers
6 skinless salmon fillets (4-6 oz each)
Salt and coarsely ground black pepper
1 medium onion
1 cup thawed frozen corn kernels
2 garlic cloves, pressed
1/3 cup water
1/2 cup sour cream or crema
1/2 tsp salt
1/4 tsp coarsely ground black pepper

1. Trim tops and bottoms off peppers using Santoku Knife; cut peppers in half lengthwise. Heat Grill Pan over medium-high heat 5 minutes. Spray pan with vegetable oil using Kitchen Spritzer. Add peppers and top with Grill Press; cook 6-8 minutes or until tender, turning once. Remove peppers from pan; refrigerate until cool enough to handle.
2. Season salmon with salt and pepper. Place salmon into Grill Pan; cook 8-9 minutes or until salmon flakes easily with a fork, turning once. Remove salmon from pan and tent with foil. Drain oil from pan.
3. Meanwhile, cut peppers into 1/4-in. strips. Slice onion crosswise into 1/4-in. slices; cut slices in half. Place onion into Grill Pan; cook over medium heat 2-3 minutes or until softened, stirring occasionally. Add peppers, corn and garlic pressed with Garlic Press. Cook and stir 1-2 minutes. Remove pan from heat; stir in water, sour cream, salt and pepper. Divide pepper mixture among serving plates; top with salmon.

Labels:

Tuesday, October 11, 2011

Zesty Ravioli Skillet

For the love of God, PLEASE wear gloves if you ever cook with jalapeno peppers! I'm begging you! And if you're going to saute jalapeno, then please turn the fan on or open your windows or something!!

Tonight was not the most enjoyable cooking experience I've had. I learned tonight that jalapenos contain the chemical capsaicin, which is what makes them hot. Not only does it make the pepper hot to eat, but capsaicin is also a skin irritant and a lung irritant. Well, after I chopped up my jalapeno pepper and added it to my hot skillet to cook, I suddenly could hardly breath. My nose and throat felt like it was on fire and I proceeded to have a sneezing and coughing fit that felt like it lasted forever. It was horrible! I felt like I couldn't catch my breath. Two hours later, I'm still sitting here with a scratchy throat.

I also quickly noticed an incredibly painful burning sensation on three of my fingers, especially on my thumb underneath my nail. It was very uncomfortable and burned horribly. I kept trying to wash my hands, but I have since learned that capsaicin is not water soluble, so holding my fingers under running water only provided temporary relief. I searched for jalapeno burn relief and found a few home remedies. Apparently rubbing alcohol works well, but we don't have any. I tried soaking my fingers in vegetable oil, but the burning quickly returned after I took my fingers out. Next I tried soaking my fingers in milk. This has relieved the pain for the longest amount of time so far. That was about 15 minutes ago and I can feel the burning starting to return.

I have never had this kind of a reaction to cooking with jalapenos before. I guess today was my lucky day.

Anyways, on to the recipe...


It was pretty good! The title definitely isn't lying though - it was very zesty! I chose this recipe because I wanted us to start having at least one meatless dinner a week. I tried this the other month with a tofu recipe. Although it was a great recipe, I don't think I fixed it very well and suddenly having tofu after countless nights in a row of meat was a bigger jump than we were ready to handle. So, I thought I would try to ease us into a vegetarian dinner with cheese ravioli. We will work our way back up to tofu!

It was a very easy recipe to put together and didn't take much time at all. Good for when you don't have a lot of time to cook but don't want to resort to going out to eat. It makes 8 servings, so I just cut everything in half so that we wouldn't have so many leftovers. If you like jalapenos, then you'll definitely like this dish! Just please wear your gloves when you handle them!!


Zesty Ravioli Skillet
Pampered Chef Quick Vegetarian Main Dishes
Published by The Pampered Chef, Ltd. in 2010.

Total time: 20 minutes  Yield: 8 servings

4 cups loosely packed fresh baby spinach leaves
6 oz provolone cheese, grated
1 tbsp olive oil
1 small jalapeno pepper, seeded
3 garlic cloves, pressed
2 cans (14.5 oz each) diced tomatoes with onions, undrained
1/2 tsp salt
1/2 tsp coarsely ground black pepper
1 pkg (24 oz) small frozen cheese ravioli
1/3 cup heavy whipping cream

1. Wash spinach in large Stainless Mesh Colander; drain. Grate cheese using Ultimate Madoline fitted with grating blade. Set aside spinach and cheese.
2. Add oil to (12-in.) Skillet; heat over medium-high heat 1-3 minutes or until shimmering. Finely chop jalapeno with Food Chopper. Add jalapeno to Skillet; cook and stir 1 minute or until crisp-tender. Press garlic into Skillet with Garlic Press; cook and stir 15-20 seconds or until fragrant.
3. Add tomatoes, salt and black pepper to Skillet; cook and stir with Bamboo Spatula 1-2 minutes or until simmering. Add ravioli; stir to coat. Cook, uncovered, 4-5 minutes or until tender. Stir cream into Skillet. Cook, uncovered, 1-2 minutes or until simmering. Sprinkle spinach over ravioli; cook, covered, 1 minute or until spinach starts to wilt.
4. Remove Skillet from heat. Top with cheese; cover Skillet and let stand 1-2 minutes or until cheese is melted.

Labels:

Monday, October 10, 2011

Florentine Stuffed Chicken Breasts

In all honesty, I was scared going into this recipe. I tried a recipe in the past that required me to roll up strips of chicken and it was a huge fail. Going into this recipe, I was hoping that I had grown as a cook since that last experience. The prep work went really well! I actually had fun doing all of the prep work. I don't know what it feels like to be a professional chef, but I sure felt like one in the kitchen tonight! haha! I took a picture of the end result right before I put it in the oven to bake just in case something happened and it all fell apart in the oven. Here is what it looked like:


I also called my husband into the kitchen at this point so that he could see it before it went into the oven in case something happened and they fell apart. He said that he was IMPRESSED!! My husband rocks :-)

And now here is what it looked like after coming out of the oven:


I also got a picture after cutting the chicken in half so that you could see the center. Unfortunately, this picture doesn't do it justice (in my opinion). When I rolled the chicken up, I think a lot of the stuffing went out to either side which made less stuffing appear in the dead center. BUT, once you cut it all up and got into it, there was plenty of stuffing for all the chicken.


Now, time to go through the recipe... It was a bit of a detailed recipe and a little more technical than what I've done before, but it was fun! There was a lot of chopping in the beginning, but once you got that out of the way, things started moving more quickly. It did not take long to saute the first few ingredients, then mix that in with the cream cheese until it is nice and smooth. Next, comes the chicken...

It is so important to get the chicken flattened as thinly as possible. It will make your life so much easier when it comes time to roll the chicken up. I just so happened to have just purchased a Meat Tenderizer through Pampered Chef, but you can get creative with flattening chicken if you don't have a meat tenderizer! A note from the cookbook - "To flatten chicken breasts, place one chicken breast half in resealable plastic food storage bag and add 1 teaspoon of water (the water will prevent the chicken from tearing and sticking to the bag). Seal bag; flatten chicken as thinly as possible without tearing using flat side of Meat Tenderizer. Repeat with remaining breast half. Discard plastic bag."

After you spread the stuffing on the chicken and roll the chicken up, the recipe says to tuck the sides in to seal. That was the only part that I couldn't quite get. I'm not sure if I didn't flatten the chicken enough or what. The chicken rolled up really easily, but some of the stuffing was sticking out of the sides and I had trouble tucking the sides in to seal the roll. But, it all worked out fine without being able to get that part!

The end result = AMAZING!!! It was soooo worth all of the effort that went into putting it all together. It took me an hour and a half from beginning to end, but I would go through all of it again in a heartbeat! The creamy spinach mixture paired with the Parmesan and bread crumb coating on the outside of the chicken was incredibly delicious. If you ever want to impress your friends, go with this recipe! It can easily be doubled (or even tripled) if you had a dinner party and really wanted to "wow!" your guests!! I know that I'm anxious make it again and have some company over - who's ready?? :-)

Florentine Stuffed Chicken Breasts
Pampered Chef Stoneware Inspirations
Published by The Pampered Chef, Ltd. in 2005.

Prep time: 30 minutes  Cook time: 5-7 minutes  Bake time: 25-30 minutes  Yield: 2 servings

Filling
1/2 cup chopped fresh mushrooms (about 3 medium mushrooms)
1/3 cup diced red bell pepper
1 small garlic clove, pressed
1 1/2 cups packed fresh baby spinach leaves, stems removed, coarsely chopped
1/8 teaspoon salt
Dash of ground black pepper
1/4 cup chive and onion cream cheese spread
1 1/2 teaspoon all-purpose flour

Chicken and Coating
2 boneless, skinless chicken breast halves (6-8 ounces each), flattened
2 slices firm white sandwich bread, grated (1/2 cup crumbs)
2 tablespoons grated fresh Parmesan cheese
1 tablespoon butter or margarine, melted
1 egg white, lightly beaten

1. Preheat oven to 425°F. For filling, spray Small (8-in.) Saute Pan with nonstick cooking spray; heat over medium heat until hot. Add mushrooms, bell pepper and garlic pressed with Garlic Press; cook and stir 3-4 minutes or until tender. Stir in spinach, salt and black pepper; cook and stir 2-3 minutes or until spinach is completely wilted. Remove spinach mixture from pan to plate lined with paper towel; cool slightly. In Small Batter Bowl, combine cream cheese spread, flour and spinach mixture; mix well and set aside.
2. For chicken, rinse chicken and pat dry with paper towels. Flatten chicken as thinly as possible without tearing. For coating, using Deluxe Cheese Grater fitted with coarse grating drum, grate bread. Fit grater with fine grating drum and grate Parmesan cheese. Combine bread crumbs and Parmesan cheese in shallow bowl. Add butter and mix until bread crumbs are completely coated; set aside.
3. To assemble, divide spinach mixture evenly onto center of each chicken breast using Large Scoop. Roll up chicken around filling, tucking in sides to seal. Generously brush chicken bundle with egg white using Pastry Brush. Place one chicken bundle into coating mixture; carefully pat mixture around bundle to coat completely. Place seam side down on Small Bar Pan. Repeat with remaining chicken bundle. Bake 25-30 minutes or until coating is deep golden brown and juices run clear.

Labels:

Sunday, October 9, 2011

Jerk Shrimp, Mango & Avocado Salad


I mentioned in a previous post that I hosted my first Pampered Chef party a few weeks ago. At that party, I ordered SIX new cookbooks!!! When the shipment arrived a few days ago, I was so excited I just didn't know what to do with myself! I have literally spent hours so far just looking through each recipe in each book. I've probably looked through each book about 5 times at this point. If you had told me even a year ago that I would grow to love cooking (especially new things) so much, I would have laughed in your face!


This recipe came from one of my new cookbooks and was actually fun to make! Although, I am probably a little biased because I was just excited to be able to use my new 5" Santoku knife so much throughout this recipe. This is a knife that also just came with the Pampered Chef shipment earlier in the week. If you only buy one Pampered Chef item in your entire life, then let it be the 5" Santoku knife!! I had no idea I could ever love a knife. This thing is amazing. I thought I had good knives before, but now I don't want to ever use anything else besides this knife. Other knives should be ashamed of themselves.


Ok, back to the recipe. Underneath the title in the cookbook, it says that "Jerk refers to an authentic Jamaican way to cook meat, poultry and seafood. But it's the combination of spicy and sweet seasonings that makes jerk what it is." I have never been a fan of hot/spicy foods. I think I just never gave it a chance. In the past, whenever I've had something that was hot/spicy, my face would turn red and I'd start coughing and look like a fool. I think that on a subconscious level I had already decided that I wouldn't like it. Well now I am trying to give hot/spicy things a chance and learn to appreciate the different flavors. Tonight's recipe was a great chance for me to do this since it uses both a Jamaican Jerk rub and a jalapeno pepper. 


The shrimp did have quite a kick to it, but the taste was delicious, especially when paired with the mango salad and lime dressing. Fantastic flavor combination! I can't believe I never gave stuff like this a chance in the past. Honestly, this whole recipe was just bursting with flavor! Made me feel like I was back in the Caribbean :-) Also, if you don't have the Pampered Chef Jamaican Jerk Rub, you can just use the Jamaican Jerk seasoning you can find in the grocery store. That's what I did!


A few notes from the cookbook: 1) To peel a mango, use the Santoku Knife to cut off top and bottom of fruit. Stand fruit upright, stem end down, on Cutting Board. Carefully cut of peel from top to bottom. Rub the top of the mango with your thumb to determine the direction of the large, flat pit. Slice off flesh alongside the pit. Cut flesh into cubes, and 2) Belgian endive is a small cigar-shaped head of white, tightly packed leaves with yellow tips. It becomes bitter when exposed to light, so it is best wrapped in a damp paper towel, then placed in a resealable plastic bag and refrigerated for no longer than  day. I actually substituted the Belgian endive with baby spinach leaves.


I used to stay away from avocados because I had no idea how to deal with them. But this short video shows you exactly how to cut and peel an avocado and how easy it is - http://www.youtube.com/watch?v=8si6bv_kcwk 


Enjoy!


Jerk Shrimp, Mango & Avocado Salad
Pampered Chef Spin on Salads
Published by The Pampered Chef, Ltd. in 2007.


Prep time: 15 minutes  Total time: About 30 minutes  Yield: 2 servings


Dressing
2 tbsp lime juice
1 tbsp sugar
1 tsp lime zest
Dash of salt
2 tbsp vegetable oil


Shrimp and Salad
1 tbsp lime juice
1 tbsp Jamaican Jerk Rub
2 tsp vegetable oil
2 tsp finely chopped jalapeno pepper
1 garlic clove, pressed
16 large, uncooked shrimp (21-25 per pound), peeled and deveined, tails removed
1 firm, ripe avocado
1 head Belgian endive, separated into leaves
1 firm, ripe mango, peeled and cut into cubes
1/4 cup chopped red bell pepper
Lime wedges


1. For dressing, combine lime juice, sugar, lime zest and salt in Small Batter Bowl. Slowly add oil, whisking until well blended. Cover; refrigerate until ready to serve.
2. For shrimp, in Classic Batter Bowl, whisk lime juice, jerk rub, oil, jalapeno pepper and garlic until well blended. Add shrimp and toss to coat. Cover; refrigerate 15 minutes.
3. Heat (10-in.) Skillet over medium heat until a drop of water sizzles. Add shrimp and cook 4-6 minutes or until shrimp turns opaque and is cooked through, turning once. Remove from Skillet.
4. For salad, peel and slice avocado using Utility Knife. For each serving, arrange avocado slices and endive leaves on serving plate. Top with mango and bell pepper; drizzle with dressing. Arrange shrimp next to salad. Serve with lime wedges.

Labels:

Create-a-Cookie

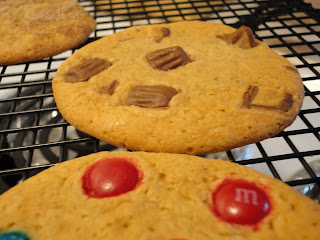
Quite possibly some of the best homemade cookies I've ever made... One big batch of cookie dough, and from that dough, made M&M cookies, chopped up peanut butter cup cookies, and cinnamon and sugar cookies - 


I really don't mean to brag, but I'm proud of myself! They turned out perfect! They were soft in the center and throughout the cookie but the the edges had just the right amount of crunch. A perfect blend. Hold on a sec, let me go grab another one...


Doing the different types of toppings was also a nice change from the standard chocolate chip cookie. The recipe is called Create-a-Cookie because the cookbook has a little chart of toppings you can use. The recipe suggests picking out 3 of the toppings so that you get a nice variety out of the cookie dough batch. The batch makes about 3 dozen cookies, so you could pick even more toppings and have even more variety if you'd like! 


A few notes from the cookbook: 1) If desired, 1 teaspoon vanilla can be substituted for the Double Strength Vanilla, 2) The first batch of cookies baked on a baking stone may require 1-2 more minutes of bake time. After the first batch, the time range indicated in the recipe should yield good results, 3) Cool cookies for 2-3 minutes before transferring them from the baking stone to the Stackable Cooling Rack. This will prevent broken or "wrinkled" cookies, and 4) If you have only one baking stone, portion the cookie dough onto Parchment Paper, cut to the diameter of the baking stone. As you remove one batch of cookies from the oven, place another parchment sheet of dough on the baking stone and into the oven.


I followed all of those notes. I don't have the Pantry Double Strength Vanilla, so I just used 1 tsp of regular vanilla (pure, not imitation). My first batch of cookies baked for 13 minutes, and the rest of the batches baked for 10 minutes. Letting the cookies cool for a few minutes really makes a difference! I used to try to move cookies to a cooling rack as soon as they came out of the oven, but they always got "wrinkled" up and fall apart. Letting them sit on the stone for a few minutes before you transfer them to the cooling rack really helps! I also used the parchment paper.


Next time you are in the mood to bake some homemade cookies, give this recipe a try! You'll love how they turn out! The recipe was really easy to follow and make. I also love any opportunity to use my KitchenAid mixer :-) Enjoy!


Create-a-Cookie
Pampered Chef Stoneware Inspirations
Published by The Pampered Chef, Ltd. in 2005.


Prep time: 10 minutes  Bake time: 10-16 minutes per batch  Yield: About 3 dozen cookies


3 cups all-purpose flour
1 teaspoon baking soda
1/2 teaspoon salt
1 cup (2 sticks) butter or margarine, softened
1 1/2 cups packed brown sugar
1/2 cup granulated sugar
2 eggs
1/2 teaspoon Pantry Double Strength Vanilla*
    (*or 1 teaspoon vanilla)
3 toppings (see below)


Toppings:
Chocolate Candy Bars - 2 bars (about 1.5 ounces each) chocolate candy
Chocolate-Coated Candies - 1/4 cup chocolate-coated candy pieces
Chocolate Peanut Butter Cups - 12 mini chocolate peanut butter cups, cut into quarters
Chopped Nuts - 1/3 cup coarsely chopped nuts
Cinnamon 'N Sugar - 1 tablespoon sugar combined with 1/8 teaspoon ground cinnamon


1. Preheat oven to 375°F. Combine flour, baking soda and salt in Classic Batter Bowl; mix well. In Stainless (4-qt.) Mixing Bowl, beat butter, brown sugar and granulated sugar until creamy. Add eggs and vanilla; beat well. Gradually beat in flour mixture.
2. Choose three Toppings; place into separate Prep Bowls. Using Medium Scoop, drop level scoops of dough 2 inches apart onto Rectangle Stone. (Cookies will spread during baking.) Flatten scoops slightly with palm of hand. Lightly press toppings into tops of cookies.
3. Bake 10-16 minutes or until cookies are almost set. (Centers will be soft. Do not overbake.) Remove from oven; cool 2 minutes on baking stone. Using Mini-Serving Spatula, remove cookies to Stackable Cooling Rack. Cool completely. Repeat with remaining dough.

Labels:

Sunday, October 2, 2011

French Onion-Pork Chop Skillet


This recipe came from the Kraft website. It was good, but not one of my favorites. I'm not sure that I will ever make it again, but that shouldn't stop you from giving it a try! 


It's not that it didn't taste good. It had a good flavor to it, but it just wasn't anything spectacular. It hardly took any time to make though, so it is a good option if you need a good meal and don't have a lot of time. The recipe says that it takes 35 minutes, but it didn't even take me that long. It serves 6, so I just cut down on the ingredients for the two of us!


I really don't have much to say about this one! It was a fine meal, but not one that will stand out in my memory down the road. Cheap and easy though!


French Onion-Pork Chop Skillet


Total time: 35 minutes  Yield: 6 servings


6 boneless pork chops (1-1/2 lb.), 1/2 inch thick
2 onions, thinly sliced
2 tbsp. Worcestershire sauce
1 pkg. (6 oz) STOVE TOP Stuffing Mix for Chicken
1-1/2 cups hot water
1 cup KRAFT Shredded Low-Moisture Park-Skim Mozzarella Cheese


1. Heat large nonstick skillet sprayed with cooking spray on medium-high heat. Add chops and onions; cook 10 minutes or until chops are done (160°F), turning chops and stirring onions after 5 min. Remove chops from skillet; set aside.
2. Cook and stir onions 5 min. or until golden brown; stir in Worcestershire sauce. Return chops to skillet. Spoon onions over chops.
3. Mix stuffing mix and water; spoon around edge of skillet. Top with cheese; cover. Cook 5 min. or until cheese is melted.

Labels: