Monday, January 9, 2012

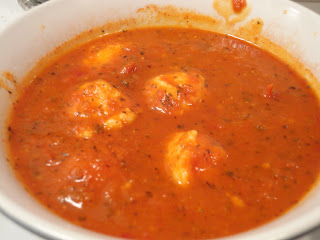
Tomato-Basil Soup with Ricotta Dumplings


If you've been following my blog, then you know that some of the foods I love the most are cheese (any type), potatoes (in any form), dip (dip for chips, not in the form of tobacco... as if I actually need to specify that?), and garlic... the tomato is another favorite food of mine. I love tomatoes! My grandfather and I used to each get a tomato, sprinkle it with salt and pepper, and just sit there and eat it like an apple. Love it!

The tomato flavor in this soup was just fantastic! It was like a tomato punch to your taste buds. And the basil blended in with the tomatoes was absolutely delicious. I've been passing over this recipe for months now - I'm so happy I finally decided to make it for our weekly vegetarian dinner tonight! The dumplings were also quite tasty. I was worried they would be too cheesy (my husband isn't a big fan of super cheesy), but that wasn't the case at all. The dumplings had a really great flavor to them without being overpowering.

A few notes from the cookbook: 1) Soup should be gently simmering when dumplings are added. Do not boil soup or the tender dumplings may break apart. Serve soup soon after cooking dumplings to maintain their texture, and 2) For the most tender dumplings, carefully measure flour by lightly spooning into cup and leveling off with a knife. Do not over-mix the batter once the flour has been added.

A very tasty meal! Each serving only has 250 calories, but it is very filling and warms you right up on a cold night! Enjoy!

Tomato-Basil Soup with Ricotta Dumplings
Pampered Chef Quick Vegetarian Main Dishes
Published by The Pampered Chef, Ltd. in 2010.

Total time: 30 minutes  Yield: 2 servings

Soup
1 tsp Basil Oil or olive oil
1 garlic clove, pressed
1 can (15 oz) crushed tomatoes, undrained
1 1/2 cups vegetable broth
1/4 cup snipped fresh basil leaves

Dumplings
1/4 cup part-skim ricotta cheese
2 tbsp grated fresh Parmesan cheese
1 egg white, lightly beaten
1/2 tsp salt
1/4 tsp coarsely ground black pepper
1/3 cup all-purpose flour
Thinly sliced fresh basil leaves

1. For soup, combine oil and garlic in (3-qt.) Saucepan; cook and stir over medium heat 1-2 minutes or just until garlic begins to turn light golden brown. Immediately add tomatoes, broth and basil. Bring to a boil. Reduce heat; simmer 5-7 minutes, stirring occasionally.
2. Meanwhile, for dumplings, combine ricotta cheese, Parmesan cheese, egg white, salt and black pepper in Small Batter Bowl; mix well. Add flour; stir just until combined. Using Small Scoop, scoop dumpling mixture directly into simmering soup. Cook until dumplings float to the surface, about 2 minutes. Remove from heat. Ladle soup into bowls; sprinkle with thinly sliced fresh basil.

Labels:

Tuesday, December 13, 2011

Spanish-Style Stuffed Peppers


I loooove this recipe! It is so good! I have made it several times before, and in the past have added sausage to the stuffing mixture. I left the sausage out today so that this could be used as our vegetarian dinner for the week. You can actually find this recipe in two different Pampered Chef cookbooks - Quick Vegetarian Main Dishes and 29 Minutes to Dinner (both excellent cookbooks).

Adding sausage makes it a bit of a more hearty meal and also adds some great flavor. But it was also very delicious tonight without the sausage! If you do decide to add the sausage, cook the sausage before you begin preparing dinner and chop it up, then add it to the rice when you're mixing the vegetables in with the rice and stir it all together.

Yellow saffron rice is so yummy to me. I probably could have just sat there and just ate the whole pot of rice, but I restrained myself. The cookbook says that, "We used packaged yellow saffron rice, available in most grocery store, to save time in preparing this recipe. Yellow rice is flavored with onion and garlic as well as saffron, the most expensive spice in the world. Saffron adds a unique flavor and a beautiful color to the rice." Lucky for us, even though saffron is the most expensive spice in the world, packaged yellow saffron rice is NOT expensive.

This sparked my curiosity, so I did a little research. The spice is actually derived from a flower and has been traded and used for over four millennia! Isn't it pretty?
saffron crocus
picture from wikipedia 

Ok, back to the recipe... the packaged yellow saffron rice seemed to have cooked a lot faster than the regular brown rice that we normally make, so just make sure it doesn't start to stick to the bottom of the pan or anything. The recipe is pretty easy to follow and really doesn't take too long to put together. It says to microwave the red peppers for 3-4 minutes, but mine are always good to go after just 3 minutes. After you stir the vegetables (and sausage, if desired) into the rice and you place the red bell pepper halves in the skillet, you need to move a little fast with spooning the stuffing mixture into the peppers and getting the water into the bottom of the skillet so that the bottoms of the peppers don't burn. The recipe yields 4 servings, but each serving (half of a stuffed pepper) only has 250 calories in it, so if you're just cooking for two and really hungry, then you might want a whole pepper each (which is what this recipe produces). Of course, if you add the sausage, then just a regular serving of one half should be enough for dinner!

I really hope you try this recipe! It is so delicious and you will be very happy that you gave it a shot!

Spanish-Style Stuff Peppers
Published by The Pampered Chef, Ltd. in 2010.

Total time: 29 minutes  Yield: 4 servings

1 pkg (5 oz or 175 g) yellow saffron rice (plus ingredients to make rice)
2 medium red bell peppers
2 medium tomatoes
1 poblano pepper or small green bell pepper
1 green onion with top
1/4 cup chopped fresh cilantro, divided
1 tsp olive oil
2 garlic cloves, pressed
3/4 cup shredded Mexican cheese blend, divided
2 tbsp water

1. Prepare rice according to package directions in (1.5-qt.) Saucepan. As rice cooks, prepare bell peppers. Slice bell peppers in half lengthwise; remove and discard stems and seeds. Microwave, covered, in Large Micro-Cooker on high 3-4 minutes or until crisp-tender. Carefully remove bell peppers and pat dry with paper towels.
2. Meanwhile, core and seed tomatoes with Core & More. Using Santoku Knife, dice tomatoes and poblano pepper. Slice green onion, Chop cilantro.
3. Add oil to (10-in.) Skillet; heat over medium heat 1-3 minutes or until shimmering. Add tomatoes, poblano pepper, onion, half of the cilantro and garlic pressed with Garlic Press; cook 2-3 minutes or until onion is tender.
4. Stir vegetable mixture and 1/2 cup of the cheese into rice in Saucepan. Place bell peppers cut side up into Skillet; spoon rice mixture evenly into each pepper and sprinkle with remaining cheese. Add water to Skillet. Cover Skillet and heat over medium-low heat 3-5 minutes or until cheese is melted. Sprinkle with remaining cilantro.

Labels:

Monday, December 5, 2011

Portobello & Blue Cheese Burgers


YUM!! This is a very tasty alternative to the traditional beef burger.

There is so much flavor packed into this burger! I loved marinating the portobello mushrooms in the balsamic vinaigrette. I don't have a Grill Pan/Grill Press, so I used our George Foreman grill, which worked out just fine! I also just used a saute pan for the onion. The onion and blue cheese were both also really good and added a nice touch to everything. The only problem I ran into was that I had some trouble eating it! I had difficulty biting into the portobello mushroom. I'm not sure if I cooked it too long, not long enough, or if that is just how portobello mushrooms are. My husband made it through the meal alright, but I ended up getting a fork and knife to eat most of it. That didn't bother me though - it was still delicious!

A few notes from the cookbook: 1) When removing brown gills from undersides of mushrooms, leave a small amount of the gills around the outer edge. This will help keep the mushroom caps intact when grilling, 2) To clean mushrooms, wipe them with a damp paper towel. To prevent mushrooms from becoming soggy, do not clean them until ready to use, and 3) Blot tomato slices with paper towels to remove excess moisture.

Give this healthy, yummy version a try next time you're in the mood for a burger! You won't be disappointed!

Portobello & Blue Cheese Burgers
Pampered Chef The Vegetarian Table
Published by The Pampered Chef, Ltd. in 2011.

Prep time: 10 minutes  Total time: 30 minutes Yield: 4 servings

4 large portobello mushroom caps (about 4-5 in. in diameter)
1/4 cup prepared balsamic vinaigrette
1 medium onion
2 tsp sugar
1 large tomato, sliced
3 oz blue cheese, crumbled
1/4 tsp coarsely ground black pepper
4 large onion rolls
1 cup mixed greens salad blend

1. Using Avocado Peeler, remove and discard brown gills from undersides of mushroom caps. Combine mushrooms and vinaigrette in large resealable plastic bag; seal bag and turn carefully to coat. Let stand 20 minutes.
2. Preheat oven to 400°F. Heat Grill Pan over medium-high heat 3 minutes. Slice onion using Simple Slice on #2 setting. Spray pan with canola oil using Kitchen Spritzer. Add onion and sugar to pan; cook 6-8 minutes or until golden brown, stirring frequently. Remove pan from heat. Remove onion from pan to Cutting Board; tent with foil and set aside.
3. Return pan to heat. Remove mushrooms from bag; carefully pour vinaigrette into [1-cup] Prep Bowl. Place mushrooms rounded side down in pan. Brush mushrooms with half of the vinaigrette using Chef's Silicone Basting Brush; top with Grill Press. Cook mushrooms 3-4 minutes or until grill marks appear. Turn mushrooms over; brush with remaining vinaigrette. Top with Grill Press and cook 3-4 minutes or until grill marks appear. Remove pan from heat.
4. Remove Grill Press. Top mushrooms with tomato slices and cheese; bake 5-6 minutes or until cheese is softened. Carefully remove pan from oven to Stackable Cooling Rack using Oven Mitts. Sprinkle with black pepper. To assemble, place onions on roll bottoms; top with mushrooms, mixed greens and roll tops.

Labels:

Monday, November 14, 2011

Sweet Potato Enchiladas


Mmmmm... this was pretty yummy :-) I was a little unsure going into the recipe. When I hear "enchiladas," I think Mexican food, and never before have I thought of sweet potatoes when I've thought about Mexican food. But the sweet potatoes added a terrific flavor to the dish! The whole combination of the sweet potatoes, vegetables and enchilada sauce and everything was delicious! This is definitely a dish that I will be cooking again.

A few notes from the cookbook: 1) Chihuahua cheese is best known as a Mexican melting cheese commonly used in quesadillas. For best results, do not use pre-shredded cheese in this recipe, and 2) When pouring remaining sauce over the enchiladas, begin along the edges of the pan and work toward the center. This will help keep the edges of the enchiladas moist. Now, having passed that information along, I will let you know that I just bought shredded Mexican cheese from the grocery store and I thought it worked out just fine!


Sweet Potato Enchiladas
Pampered Chef The Vegetarian Table
Published by The Pampered Chef, Ltd. in 2011.

Prep time: 40 minutes  Total time: 1 hour  Yield: 6 servings

1 large sweet potato, peeled
1 medium red bell pepper
1 medium onion
1 cup frozen corn, thawed
4 garlic cloves, pressed
1 tbsp canola oil
2 tsp ground cumin
8 oz Chihuahua cheese, divided
1/2 cup chopped fresh cilantro
2 cups red enchilada sauce, divided
12 [6-in.] corn tortillas
Sour cream and additional chopped cilantro [optional]

1. Preheat oven to 400°F. Dice sweet potato and bell pepper into 1/2-in. pieces. Finely chop onion using Food Chopper. Spray [10-in.] Skillet with canola oil using Kitchen Spritzer. Heat over medium-high heat 1-3 minutes or until shimmering. Add corn; cook, covered, 1-2 minutes or until golden brown.
2. Reduce heat to medium-low. Stir in sweet potato, bell pepper, onion, pressed garlic, oil and cumin. Cook, covered, 4-6 minutes or until sweet potato is tender, stirring occasionally. Remove Skillet from heat; cool sweet potato mixture 10 minutes.
3. Grate cheese using Microplane Adjustable Coarse Grater. Combine sweet potato mixture, cilantro, 1/2 cup of the enchilada sauce and half of the cheese in Classic Batter Bowl; mix well.
4. Place tortillas into Large Micro-Cooker. Microwave, covered, on high 1-2 minutes or until warmed. Spread 1/2 cup of the enchilada sauce over bottom of Rectangle Baking Pan. Arrange six of the tortillas over flat side of Large Grooved Cutting Board. Fill each tortilla with about 1/4 cup of the sweet potato filling. Roll up tortillas and place seam side down into pan. Repeat with remaining tortillas and filling. Pour remaining 1 cup sauce of enchiladas; sprinkle with remaining cheese.
5. Cover pan with aluminum foil. Bake 18-20 minutes or until cheese is melted. Serve with sour cream and additional chopped cilantro, if desired.

Labels:

Thursday, November 3, 2011

Artichoke & Red Bell Pepper Risotto


I have quite a story to go along with this dish. You probably don't care to hear all of it, but I'm going to share it anyway. And if you're reading this blog, then you must be interested in my stories! :-) Anyways, I normally do all of my grocery shopping on Sunday. Back in the day, I used to go day to day figuring out what to do for dinner and go to the store after work each day and I hated it. So now, I plan out the week on Sunday morning and make one trip. Well, this past Sunday I wasn't feeling well (scratchy throat, congestion), so I never made it to the grocery store. That meant that I had to go grocery shopping on Monday at 5pm... uggggh. 

I don't think I need to explain how much it sucks to go grocery shopping at 5pm on a Monday. Well, I normally do most of my shopping at Food Lion, so that is where I headed. It was not a good trip. Besides the traffic and massive amounts of grumpy people filling the aisles of the store, Food Lion was out of several items I needed, including the salmon I needed for dinner that night (see my last post), and the Arborio rice I needed for this dish (which I made on Tuesday). I probably spent 10-15 minutes on the rice aisle looking for Aroborio rice. I even called my husband and asked him to google it and try to describe to me what the package looked like. No Arborio rice. So, I was already irritated that I was even grocery shopping on a Monday after work, and now Food Lion was out of several items that I needed and didn't even carry any brand of Arborio rice.

I try to make the best out of the situation. A brand new Harris Teeter just opened in town and I had only been in there briefly one time so far, but could tell from that one brief visit that it was a pretty amazing grocery store. So, I thought to myself, here is an excuse to visit the new, very nice, Harris Teeter. Everything will be okay. 

I am on my way from Food Lion to Harris Teeter, cruising along in the right hand lane approaching a green light, then this JERK in the left hand lane cuts RIGHT in front of me! It is a miracle that I did not slam into him. I slammed my breaks on and heard tires screeching, so I looked in my rear view mirror (worried that another car was about to slam into me from behind) only to realize that I was the one making the horrible tire screeching noise and had smoke behind my car from slamming my breaks so hard. I seriously came within an inch of ramming this dude. Again, I'm amazed I didn't slam into him. And I didn't even get a courteous, apologetic hand wave or anything from this guy! Some people!

So, needless to say, that really shook me up and freaked me out and I had to pull over into a parking lot to regain my composure, call my husband, talk to him until I calmed down some and felt able to drive again. I finally make it to the new Harris Teeter and get all of my items that Food Lion failed to provide me, INCLUDING the Arborio rice for this recipe. Not only did they have Arborio rice, but they had about 5 different brands of it! I love this new Harris Teeter! Not only do they have a wide selection of every day items, but they have a HUGE meat display case, a wide selection of sushi, and a "Cheeses of the World" section (you can read about my love of cheese here in Cajun Shrimp with Smoked Gouda Grits).

Oh, wait, you were reading this blog to hear about the recipe? My bad. Anyways, this recipe was pretty good. I really liked the rice (especially after everything I went through to get the specific rice for it). The dish as a whole was kind of rich though. I'm not really sure what made it so rich. Some cheese was added to it, but I didn't feel like it was that much cheese. And plus, I love cheese. So, I don't know that that was it... maybe it was the artichokes? Or just the creamy nature of the risotto from adding the broth to the rice? I'm not sure, but it was very rich and we could only eat so much of it. But what we DID eat, we enjoyed! Don't get me wrong, it had a great flavor to it!

Well, I think I have rambled on enough for one post, don't you think? It was a good dish and definitely worth trying at least once! I hope you enjoy it, and hope you don't have to go through such an ordeal to get all of your ingredients! :-)

Artichoke & Red Bell Pepper Risotto
Published by The Pampered Chef, Ltd. in 2010.

Total time: 28 minutes  Yield: 6 servings

5-6 cups vegetable broth, divided
2 jars (7.5 oz) quartered marinated artichoke hearts, drained, divided
3 shallots
1 tbsp olive oil
1 1/2 cups uncooked Arborio rice
1 1/2 cups dry white wine such as Chardonnay
1 lemon
1 small red bell pepper
1/2 cup frozen peas
2 oz cream cheese, softened
2 oz Parmesan cheese, grated (about 1/2 cup)
Snipped fresh chives (optional)

1. Heat broth in (2-qt.) Saucepan over medium-high heat until simmering. Reduce heat to medium-low. Meanwhile, place artichokes into Executive (12-in.) Skillet (do not use stainless cookware); saute over medium-high heat 4-5 minutes or until light golden brown. Remove from Skillet; reserve 1/2 cup of the artichokes. Set aside remaining artichokes.
2. Meanwhile, finely chop shallots using Santoku Knife. Add oil, shallots and rice to Skillet; cook and stir 1-2 minutes or until shallots are tender and and rice is shiny and translucent. Add wine; cook 1-2 minutes or until wine is completely evaporated, stirring with Small Bamboo Spatula. Carefully add 1 cup of the broth to Skillet; cover an cook 2-3 minutes or until liquid is absorbed, stirring occasionally. Repeat with remaining broth in 1-cup increments, cooking 2-3 minutes after each addition or until liquid is absorbed (13-15 minutes total cook time). Remove Skillet from heat.
3. Meanwhile, zest lemon with Microplane Adjustable Grater to measure 1 tbsp. Cut bell pepper into 1-in. pieces. Stir remaining artichokes, zest, bell pepper, peas, cream cheese and Parmesan cheese into rice. Top with reserved artichokes and garnish with snipped fresh chives, if desired.

Labels:

Monday, October 17, 2011

Eggplant Parmesan Pizza

I think I've got Domino's beat with this one...


This pizza turned out SO great!! The dough was quite delicious. The recipe calls for the use of refrigerated prepared pizza dough, but I decided to make my dough from scratch -


I used to think that it was crazy to have a pizza without any meat on it, but I'll take this Eggplant Parmesan Pizza any day!


Ok, first let's start with the dough. As I said, the recipe calls for refrigerated prepared pizza dough. Lately, I have been preferring to make things from scratch (example: Create-a-Cookie). My good friend Sara has similar feelings, and posted this great pizza dough recipe on her blog a few weeks ago. (She has a pretty fantastic blog, by the way! Along with entertaining and witty stories each day, she makes food related posts on Fridays! http://messingwithtexas.wordpress.com/)

Here is the link to her blog post where she posted the recipe for this pizza dough that I used tonight: http://messingwithtexas.wordpress.com/2011/09/23/margherita-pizza/

You can just follow the Pampered Chef recipe and use refrigerated prepared pizza dough, but this made from scratch recipe makes INCREDIBLE pizza dough!! It really added so much to my pizza tonight! She did tell me to do things just slightly differently tonight from what she posted in her blog. When I got the dough out of the refrigerator tonight, I rolled it into a ball and let it sit for 15 minutes. Then I flattened it out, and let it sit again for 15 minutes. I then flattened it out, and let it sit for another 15 minutes. I'm pretty sure it was after those 3 sets of 15 minutes, the dough was where I wanted it. You can always repeat the flattening and letting it sit for 15 minutes however many times you need/like.

Aside from the fantastic pizza dough, all of the other parts of the pizza were amazing as well! The sauce had so much flavor to it! In the cookbook, it says that "the homemade sauce on this pizza tastes much better than canned varieties and is worth the extra effort." I couldn't have said it better myself! It was just packed with flavor. You can't even compare it to a can of pizza sauce.

Now, the eggplant! I was very, very pleasantly surprised! The only time I have ever had eggplant was in a cooking class I took 5 years ago in college when we made a Parmesan Eggplant dish. I don't remember being very impressed, because I have never eaten or cooked with eggplant since then. It was so delicious on this pizza! Really added a LOT of flavor to the pizza. I am normally a Pepperoni Pizza kind of girl, but I loved the eggplant! From now on, any time I make pizza, I think that this is going to be the recipe that I will always go to.

A few notes that I just remembered - if you use the from-scratch dough, then once you have your dough spread/flattened out, bake the dough for 5 minutes at 475°F. Then, turn the oven down to 425°F to follow the baking instructions that the Pampered Chef recipe lists after you put the toppings on the pizza. Also, another thing I did different was cut my eggplant slices into quarters after I cooked them but before I put them on the pizza. The slices were a little big, and having them more cut up made the pizza easier to eat, I think.

Incredibly delicious pizza! You will be happy that you made this instead of ordering out!


Eggplant Parmesan Pizza
Pampered Chef The Vegetarian Table
Published by The Pampered Chef, Ltd. in 2011.

Prep time: 40 minutes  Total time: 55 minutes  Yield: 8 servings

4 tbsp olive oil, divided
4 garlic cloves, pressed
1 can (15 oz) tomato sauce
2 tsp sugar
1 tsp finely chopped fresh rosemary leaves
1/2 tsp coarsely ground black pepper
1 lb refrigerated prepared pizza dough
1 lb Japanese or Chinese eggplant (about 2 medium eggplants)
8 oz mozzarella cheese, shredded
1/2 oz Parmesan cheese, grated
1/2 cup chopped fresh basil leaves

1. Preheat oven to 425°F. For sauce, combine 1 tbsp of the oil and pressed garlic in (1.5-qt) Saucepan. Cook over medium heat 60-90 seconds or until fragrant. Add tomato sauce, sugar, rosemary and black pepper; bring to a simmer. Reduce heat to low; cook 5-7 minutes or until thickened. Remove Saucepan from heat; set aside.
2. Meanwhile, lightly brush Stoneware Cookie Sheet with 1 tbsp of the oil. Roll dough to edges of Cookie Sheet using Baker's Roller, stretching dough to cover bottom. Prick dough with pastry tool. Bake 18-20 minutes or until top of crust begins to brown.
3. Trim and discard ends of eggplants and slice into 1/2-in. disks using Chef's Knife. Heat remaining 2 tbsp oil in (12-in.) Skillet over medium heat 1-3 minutes or until shimmering. Cook eggplants 10-12 minutes or until browned, turning occasionally. Remove Skillet from heat.
4. Combine cheeses in Classic Batter Bowl; mix well. Spread 1 cup of the sauce over crust. Top evenly with eggplants and cheese mixture. Bake 14-16 minutes or until cheese begins to brown. Remove Cookie Sheet from oven to Stackable Cooling Rack; cool 5 minutes. Cut pizza into 16 pieces using Pizza Cutter; drizzle with remaining sauce and sprinkle with basil.

If you decide to make the from-scratch dough, just substitute any Pampered Chef directions about the dough with the recipe on Sara's blog until it is time to put the toppings on the pizza. Then follow the Pampered Chef directions about temperature and baking time for the dough. Also, refrigerate your eggplant after you buy it and use within a day or two or else it will become bitter. Enjoy!

Labels:

Tuesday, October 11, 2011

Zesty Ravioli Skillet

For the love of God, PLEASE wear gloves if you ever cook with jalapeno peppers! I'm begging you! And if you're going to saute jalapeno, then please turn the fan on or open your windows or something!!

Tonight was not the most enjoyable cooking experience I've had. I learned tonight that jalapenos contain the chemical capsaicin, which is what makes them hot. Not only does it make the pepper hot to eat, but capsaicin is also a skin irritant and a lung irritant. Well, after I chopped up my jalapeno pepper and added it to my hot skillet to cook, I suddenly could hardly breath. My nose and throat felt like it was on fire and I proceeded to have a sneezing and coughing fit that felt like it lasted forever. It was horrible! I felt like I couldn't catch my breath. Two hours later, I'm still sitting here with a scratchy throat.

I also quickly noticed an incredibly painful burning sensation on three of my fingers, especially on my thumb underneath my nail. It was very uncomfortable and burned horribly. I kept trying to wash my hands, but I have since learned that capsaicin is not water soluble, so holding my fingers under running water only provided temporary relief. I searched for jalapeno burn relief and found a few home remedies. Apparently rubbing alcohol works well, but we don't have any. I tried soaking my fingers in vegetable oil, but the burning quickly returned after I took my fingers out. Next I tried soaking my fingers in milk. This has relieved the pain for the longest amount of time so far. That was about 15 minutes ago and I can feel the burning starting to return.

I have never had this kind of a reaction to cooking with jalapenos before. I guess today was my lucky day.

Anyways, on to the recipe...


It was pretty good! The title definitely isn't lying though - it was very zesty! I chose this recipe because I wanted us to start having at least one meatless dinner a week. I tried this the other month with a tofu recipe. Although it was a great recipe, I don't think I fixed it very well and suddenly having tofu after countless nights in a row of meat was a bigger jump than we were ready to handle. So, I thought I would try to ease us into a vegetarian dinner with cheese ravioli. We will work our way back up to tofu!

It was a very easy recipe to put together and didn't take much time at all. Good for when you don't have a lot of time to cook but don't want to resort to going out to eat. It makes 8 servings, so I just cut everything in half so that we wouldn't have so many leftovers. If you like jalapenos, then you'll definitely like this dish! Just please wear your gloves when you handle them!!


Zesty Ravioli Skillet
Pampered Chef Quick Vegetarian Main Dishes
Published by The Pampered Chef, Ltd. in 2010.

Total time: 20 minutes  Yield: 8 servings

4 cups loosely packed fresh baby spinach leaves
6 oz provolone cheese, grated
1 tbsp olive oil
1 small jalapeno pepper, seeded
3 garlic cloves, pressed
2 cans (14.5 oz each) diced tomatoes with onions, undrained
1/2 tsp salt
1/2 tsp coarsely ground black pepper
1 pkg (24 oz) small frozen cheese ravioli
1/3 cup heavy whipping cream

1. Wash spinach in large Stainless Mesh Colander; drain. Grate cheese using Ultimate Madoline fitted with grating blade. Set aside spinach and cheese.
2. Add oil to (12-in.) Skillet; heat over medium-high heat 1-3 minutes or until shimmering. Finely chop jalapeno with Food Chopper. Add jalapeno to Skillet; cook and stir 1 minute or until crisp-tender. Press garlic into Skillet with Garlic Press; cook and stir 15-20 seconds or until fragrant.
3. Add tomatoes, salt and black pepper to Skillet; cook and stir with Bamboo Spatula 1-2 minutes or until simmering. Add ravioli; stir to coat. Cook, uncovered, 4-5 minutes or until tender. Stir cream into Skillet. Cook, uncovered, 1-2 minutes or until simmering. Sprinkle spinach over ravioli; cook, covered, 1 minute or until spinach starts to wilt.
4. Remove Skillet from heat. Top with cheese; cover Skillet and let stand 1-2 minutes or until cheese is melted.

Labels:

Monday, August 8, 2011

Asparagus Stir-Fry


I took a break from Pampered Chef tonight and tried a recipe from another food blog. I have been thinking lately that I would like to start adding a vegetarian dish one night a week to our menu. I discussed this with my dear friend, Sara, whom I knew only had meat one night a week and cooked vegetarian the rest of the week. She often uses tofu. Like a lot of people, I have always held the stereotypical view that tofu is gross. Sara gave me a few recipes to help us ease into the use of tofu and vegetarian dishes, one of which comes from a GREAT food blog that I used tonight! So, I decided to give tofu a try. To use a phrase that my husband, brother-in-law and I often use, I guess I was feeling a little squirrely. :-)

Going into this recipe tonight, I was still a little nervous about what the tofu would be like. The recipe was really easy to follow, and I love getting to use my wok! I thought everything turned out really good! It was a bit more spicy than I was expecting. I'm not sure why I didn't see the crushed red pepper flakes in the ingredients and not think to myself that this would be a spicy hot dish...

I wasn't really sure what to expect with the tofu, but it wasn't as bad as I always thought it would be! It actually wasn't bad at all. I will definitely use it again. The consistency is something that I would have to get used to, but the tofu in this dish had a good flavor to it.

Instead of posting the recipe, I am going to post a link to the food blog that it came from. This is a great food blog (and a bit more professional than mine)! Step outside of your comfort zone and give this tofu recipe a try!

http://www.101cookbooks.com/archives/asparagus-stirfry-recipe.html

Labels: