Saturday, February 9, 2013

Eggplant, Onion & Tomato Pizza


Oh, hey! Yep, this is me actually posting again. As I'm sure you've noticed, I have not been posting as usual over the last few months. I'm hoping to change that now! I hate to use the "I've been busy" excuse, but that is honestly what has been going on. I have not had anywhere near the amount of time to plan and fix dinner that I used to have. This isn't to say that things aren't going well, because they are. Life is fantastic! But between a new job, new activities, and a new city to explore, my time in the kitchen has become limited. However, two things have happened in the last few days. 1) I received a very nice comment on a very old blog post from a complete stranger the other day that made me feel encouraged to get back into the swing of things, and 2) I had a lot of fun cooking dinner tonight.

I have posted a few pizza recipes over the last year, and this one was quite tasty! I found a recipe in a cookbook, but modified it to my liking, which I'll post below. I was a little skeptical about making a pizza that didn't use a red sauce (or any sauce at all), but it wasn't even needed on this pizza! You wouldn't even realize you were eating a vegetarian pizza unless I told you! It was delicious! For the crust, I used my friend Sara's pizza dough recipe, which I am a firm believer in and I will never ever use another pizza dough for as long as I live (it's THAT good).

As for roasting the vegetables, I got a pretty large eggplant, so I ended up having to do my roasting in two different sessions because I didn't have enough room on my roasting pan. I roasted the eggplant first, then roasted the tomatoes and onion together next. If you aren't a huge fan of hot/spicy things, I would reduce the amount of red pepper flakes. I added a teaspoon, which at the time didn't seem like a whole lot, but I ended up needing a glass of milk by the end of dinner because my mouth was on fire. I don't have as high of a tolerance as other people though. I would suggest only using 1/2 teaspoon red pepper flakes in the recipe and then sprinkling more on top of your slice of pizza as you like. The roasted vegetables added a lot of flavor to the pizza. Overall, a great success! Enjoy!

(By the way, I just realized that the recipe I modified this from used balsamic vinegar and I am SO UPSET that I missed this because I LOOOOOVE balsamic vinegar! :-( I'm so disappointed! Balsamic vinegar would have really set this pizza apart above others. I'll just have to make it again soon. :-) I included the balsamic vinegar in my modified version below because I don't want you to make the same mistake I did and not include it!)

Eggplant, Onion & Tomato Pizza
modified from Grilled Pizza with Eggplant and Tomatoes from Weeknight Fresh and Fast by Kristine Kidd

Ingredients
pizza crust ingredients and recipe found here
olive oil
2 tbsp balsamic vinegar
salt and pepper
1 large eggplant, cubed
1 red onion, sliced
1 pint cherry tomatoes, sliced lengthwise
1 (8 oz) package shredded mozzarella cheese
1/4 cup grated Parmesan cheese
1 teaspoon red pepper flakes
1 teaspoon dried basil

1. Make pizza dough as instructed.
2. Preheat the oven to 475°F. Brush pizza dough with olive oil and bake for 7-9 minutes or until slightly browned.
3. Remove pizza dough from oven. In a bowl, toss eggplant, onion and tomatoes in olive oil. Lay out on roasting pan and sprinkle with salt and pepper. Roast for 10 minutes or until done.
4. Reduce heat to 425°F. In a bowl, toss roasted vegetables with balsamic vinegar, Parmesan cheese, red pepper flakes, and basil. Sprinkle a handful of mozzarella cheese on the pizza crust, then add the roasted vegetable mixture on top of the pizza dough. Sprinkle remaining mozzarella cheese on top of entire pizza. Bake for 10-12 minutes or until cheese is starting to brown slightly.


Monday, November 12, 2012

Lemon Chicken Breasts


What a delightfully yummy meal! It was very light, but full of flavor. The sauce that the chicken cooked in was terrific and the chicken really soaked up that juice and the wine, garlic and lemon flavors all really came through well. I got boneless, skinless chicken breasts instead of skin on chicken breasts, and they took right at 30 minutes to bake.

Enjoy!

Lemon Chicken Breasts

Total time: 1 hour  Yield: 4 servings

1/4 cup good olive oil
3 tbsp minced garlic (9 cloves)
1/3 cup dry white wine
1 tbsp grated lemon zest
2 tbsp freshly squeezed lemon juice
1 1/2 tsp dried oregano
1 tsp minced fresh thyme leaves
kosher salt and freshly ground black pepper
4 boneless chicken breasts, skin on (6 to 8 ounces each)
1 lemon

1. Preheat the oven to 400°F.
2. Warm the olive oil in a small saucepan over medium-low heat, add the garlic, and cook for just 1 minute but don't allow the garlic to turn brown. Off the heat, add the white wine, lemon zest, lemon juice, oregano, thyme, and 1 teaspoon salt and pour into a 9 by 12-inch baking dish.
3. Pat the chicken breasts dry and place them skin side up over the sauce. Brush the chicken breasts with olive oil and sprinkle them liberally with salt and pepper. Cut the lemon in 8 wedges and tuck it among the pieces of chicken.
4. Bake for 30 to 40 minutes, depending on the size of the chicken breasts, until the chicken is done and the skin is lightly browned. If the chicken isn't browned enough, put it under the broiler for 2 minutes. Cover the pan tightly with aluminum foil and allow to rest for 10 minutes. Sprinkle with salt and serve hot with the pan juices.

Monday, November 5, 2012

Barbecue-Glazed Salmon with Green Beans & Corn


After almost a month of no posting - I'm back! The last time I posted, I had just started my new job. It is hard to believe that I've been there for a whole month already! In case you're wondering, I LOVE it!

Although I haven't been posting, I have still been cooking, thought not as much. My husband has been helping with fixing many dinners over the past month (because he rocks). After working from home for the last 2+ years and getting used to being done with work at 4:15pm and able to spend hours in the kitchen fixing dinner and trying lots of new recipes, I'm still trying to get used to being away at work and not getting home until 6:15ish (not to mention the nights that I go to the gym and don't get home until 7:30pm). I think I'm starting to get better at that balance of work and life. It has taken some adjusting, but I'm getting there.

Tonight is an excellent example of what a great dish this is. I had a meeting after work and didn't get home until about 6:45pm, but this easy-to-fix, no-fuss meal made putting a healthy dinner on the table a super easy task! All you have to do is toss some vegetables together in a skillet and throw the salmon in the oven and you're good to go. Plus, it's delicious! I got Kraft Hickory Smoke BBQ Sauce, and that tasted really good with the salmon. Make sure to give this recipe a try next time you need something quick and healthy! Enjoy!

Barbecue-Glazed Salmon with Green Beans & Corn

Total time: 20 minutes  Yield: 4 servings

1 tbsp olive oil
3/4 pound green beans, cut into 1 1/2-inch lengths
4 scallions, white and green parts separated and thinly sliced
Kosher salt and black pepper
1 cup frozen corn
1 1/4 pounds skinless salmon fillet, cut into 4 pieces
1/4 cup barbecue sauce
1/4 cup torn fresh basil leaves

1. Set an oven rack in the highest position and heat oven to 500°F.
2. Heat the oil in a large skillet over medium-high heat. Add the green beans, scallion whites, 1/2 teaspoon salt, and 1/4 teaspoon pepper. Cook, tossing frequently, until the green beans begin to soften, 5 to 7 minutes. Add the corn and cook, tossing frequently, until the vegetables are tender, 3 to 4 minutes more. Fold in the scallion greens.
3. Meanwhile, place the salmon on a foil-lined baking sheet and season with 1/4 teaspoon each salt and pepper. Dividing evenly, brush with the barbecue sauce. Bake until cooked through, 8 to 12 minutes.
4. Serve the salmon with the vegetables and sprinkle with the basil.

Monday, October 8, 2012

Last Minute Stir-Fry


You have my husband to thank for this recipe! We were out of town over the weekend, so I wasn't able to participate in my usual Sunday ritual of planning out dinner for the whole week and going grocery shopping for the week. So that meant that it was Monday and I got home from work with no plans for dinner. As much as I love to cook, I hate the feeling of it being the end of the day and I have no idea what I'm going to fix for dinner. It just puts me in a bad mood. I think it is knowing that I have to go to the grocery store at dinner time on a weeknight that puts me in a bad mood. I hate grocery shopping at dinner time on a week night. This is why I started planning out the entire week on Sunday mornings.

Anyways, I decided to avoid the situation and go for a run instead. Meanwhile, my awesome husband saved the day and came up with this idea for dinner. It is easy to fix, healthy, and delicious! We just had a bottle of Sweet & Sour sauce that we had bought at the store already. That sauce had a really good flavor that paired really well with the shrimp and peppers. It is a simple, yummy meal to throw together that's great for weeknights (or any night) when you're either tired after a long day or just don't have a whole lot of time to spend in the kitchen!

Enjoy!

Last Minute Stir-Fry

Total time: 25 minutes  Yield: 2 servings

2 servings brown rice
1 green bell pepper
1 red bell pepper
1 tomato
2 servings frozen shrimp, defrosted and peeled
Sweet & Sour sauce
olive oil
salt and pepper

1. Cook rice according to package. Meanwhile, slice green and red peppers. Chop tomato.
2. Heat olive oil in skillet over medium-high heat. Saute green and red bell peppers until tender. Add tomato and saute for another minute.
3. Season shrimp with salt and pepper. Add shrimp to skillet and saute until pink and cooked through, about 4 to 5 minutes. Add Sweet & Sour sauce and mix everything together. Serve rice topped with shrimp and vegetable mixture.

Tuesday, October 2, 2012

Tuna Patties


My dad used to make tuna patties pretty frequently when I was growing up. It was one of those staple meals that we probably always had the ingredients for. I'm not sure if it is because we had them so much growing up, but I have hardly had them at all since I moved out of my parent's house 8 years ago. I'm so happy I made these! Not only did it bring back memories, but they were delicious!

These patties had a great combination of flavors. The tabasco added a great little kick to them! It wasn't too overpowering, but blended in really well with all of the other flavors and added a nice touch that set these tuna patties apart (although my dad's tuna patties will always be the best). :-)

An easy, healthy, simple recipe, and great to fix when you don't have a lot of time to mess with dinner. Enjoy!

Tuna Patties

Prep time: 10 minutes  Cook time: 10 minutes  Yield: 4 patties

2 6-ounce cans tuna
2 tsp Dijon mustard
1/2 cup white bread torn into small pieces
1 tsp lemon zest
1 tbsp lemon juice
1 tbsp water (or liquid from the cans of tuna)
2 tbsp chopped fresh parsley
2 tbsp chopped fresh chives, green onions, or shallots
salt and freshly ground black pepper
a couple squirts of Crystal hot sauce or tabasco
1 raw egg
2 tbsp olive oil
1/2 tsp butter

1. Drain the liquid from the tuna cans. If you are using tuna packed in water, reserve a tbsp of the tuna water, and add a tsp of olive oil to the tuna mixture in the next step.
2. In a medium bowl, mix together the tuna, mustard, torn white bread, lemon zest, lemon juice, water, parsley, chives, and hot sauce. Sprinkle on salt and freshly ground black pepper. Taste the mixture before adding the egg to see if it needs more seasoning to your taste. Mix in the egg.
3. Divide the mixture into 4 parts. With each part, form into a ball and then flatten into a patty. Place onto a wax paper lined tray and chill for an hour. (You can skip the chilling if you want, chilling just helps the patties stay together when you cook them.)
4. Heat the olive oil and a little butter (for taste) in a cast iron or stick-free skillet on medium high. Gently place the patties in the pan, and cook until nicely browned, 3-4 minutes on each side.
5. Serve with wedges of lemon. You can also serve with tartar sauce on slider buns for a tuna burger.

Veggie Tacos


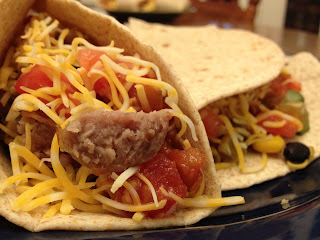
Heck YES these were awesome! This was supposed to be a vegetarian meal, but as you can see we added some leftover sausage to the tacos. I made one with sausage and one without - both excellent options!

I will most definitely be making these again soon!

Veggie Tacos

1 small zucchini, chopped
1 roma tomato, chopped
1/2 cup corn
1/2 cup cooked black beans
1/2 cup diced red onion
pinch of salt and pepper
pinch of ground cumin
1 t cooking oil (or a small amount of cooking spray)
1 pepper jack cheese stick, grated (optional)
salsa, sour cream, etc (optional)
tortillas

1. In a small skillet, heat the oil over medium high heat. Add the onion and cook for about 1 minute, until it starts to turn translucent.
2. Add the zucchini, corn, black beans and seasonings, and cook for 2 minutes, so that the zucchini softens a bit but is not mushy. Remove from heat.
3. Heat the tortillas until soft. Spoon equal amounts of veggies onto each one and add the diced tomatoes. Sprinkle with a small amount of grated cheese, add your favorite taco toppings, and enjoy!

Mushroom Stuffed Zucchini with Parmesan Panko Topping


This was a very different recipe. At least different from what we're used to. It wasn't one of my favorites, but it was still good. I can't promise that I'll ever make it again, but I'm glad we gave it a try! It tasted pretty good, but by the end of dinner, I was kind of tired of zucchini.

I think this would be good as a side dish, like, if you had just half of a zucchini as a side. About an hour and half after we were done eating, my stomach was growling, so this just wasn't enough as a main entree. I would give it a try though just to say that you tired something a little different! You might surprise yourself and really like it! And as I said, it was good, just not my most favorite thing I've ever made :-)

Mushroom Stuffed Zucchini with Parmesan Panko Topping

3 zucchinis, cut in half lengthwise, center spooned out
2 tsp olive oil
8 oz cremini mushrooms, sliced
1/2 sweet yellow onion, diced
3 small cloves of garlic, minced
sea salt and freshly cracked pepper, to taste
fresh basil, chopped
4 tbsp Parmesan cheese, shredded (divided)
3 tbsp Italian seasoned panko crumbs

1. Preheat the oven to 350°F. Line a baking sheet with tin foil.
2. Heat the olive oil in a skillet over medium high heat. Add the onions and mushrooms to the skillet and cook until tender, about 4-5 minutes. Add the minced garlic, sea salt, and freshly cracked pepper, to taste then stir constantly for 1 minute. Remove from heat and let cool.
3. Cut the zucchini in half lengthwise then slightly scoop out the filling down the center of the zucchini. Add 3 tbsp of Paremesan cheese to the mushroom mixture as well as the chopped basil, mix well. Spoon the mushroom mixture down the center of the zucchini. Mix remaining tbsp of Parmesan cheese with the panko crumbs. Sprinkle the top of each zucchini boat he panko crumbs.
4. Bake in the oven for 25 minutes or until golden brown. Remove from the oven and serve immediately.

Italian Sausage and Pasta


It doesn't get much easier than this! Just boil some pasta, saute some sausage and veggies and you're done!

The recipe calls for the Johnsonville Three-Cheese Italian Style Sausage, but my husband isn't the biggest cheese fan in the world and I thought that may be too cheesy for him, so I got Johnsonville (already cooked) Smoked Sausage. YUM! I love food that has a smoked flavor to it, and it really came through in this dish. Getting the already cooked sausage cut down on cooking time, and just adjust the measurements depending on how many people you're cooking for. You could really take many different directions with this dish and fix it however you like - different types of pasta, different types of sausage, various veggies or sauces... get creative!

Italian Sausage and Pasta

1 package (16 ounces) penne pasta
1 package 13.5 ounces Johnsonville Three-Cheese Italian Style Sausage, sliced
1 tbsp olive oil
1 medium green pepper, julienned and cut in half
1 medium sweet red bell pepper, julienned and cut in half
1 medium onion, halved and sliced
1 clove garlic, minced
1 jar (24 ounces) marinara sauce, heated

1. Cook pasta according to package directions.
2. In a skillet, brown sausage in oil for 3 to 4 minutes.
3. Add peppers, onion and garlic.
4. Continue to cook until vegetables are tender.
5. Divide prepared pasta in bowls, top with marinara sauce and sausage vegetable mixture.

Sweet Potato and Spinach Burrito


For a vegan burrito, this was pretty good!

It had a great flavor to it. But, if I were to make it again, I would mix the sweet potato and black bean mixture all together and then fill the burrito shell. By putting a layer of sweet potato and then a layer of the black bean mixture, I got a few bites that were just chock-full of sweet potato and it was a little much. However, I should say that I didn't actually measure out how much sweet potato puree I made, so I could have made too much...

But aside from the few mouthfuls of sweet potato (and don't get me wrong, I love sweet potatoes, but I think there is a thing as too much) -- aside from that, the combination of all of the ingredients was excellent! The chipotle powder added a nice touch to the blend of flavors. Like I said, if I could go back and do this over again, I would definitely mix everything together before stuffing the tortillas. You live and you learn!

Make sure to check out the blog that this recipe came from to see how to make the sweet potato puree.

Sweet Potato and Spinach Burrito

Total time: 25 minutes  Yield: 2 servings

2 whole wheat tortillas
1-1 1/2 cup sweet potato puree
1/2-1 tsp chipotle powder
1 tbsp olive oil
1 small onion, diced
1/4 cup green pepper, diced
1/2 cup black beans (if using canned, drain)
1 large handful spinach
1/4 cup fresh cilantro
2 tbsp fresh squeezed lime juice

1. Make sweet potato puree and mix in chipotle powder. Taste and adjust the chipotle seasoning - use cautiously, it can be hot! Set aside.
2. In a skillet, heat olive oil over medium heat. Add in onions and peppers and cook for 3-4 minutes or until onions become translucent. Stir in black beans and continue to cook for 2-3 minutes. Finally, add in spinach, cilantro, and lime juice cooking until spinach becomes slightly wilted.
3. To finish the burrito I use my panini press pan. Place 1/2 the sweet potato mixture in the center of the tortilla and add a few spoonfuls of the spinach/black bean mixture on top. Roll and place them seem side down on the heated-up press. Heat for 1-2 minutes, flip, and heat until both sides have slightly browned.

Creamy Skillet Potatoes


Oh how I love potatoes. I know they aren't the most healthy thing in the world to eat mass quantities of, but I so wish they were! That would make me so happy to have an endless supply of potatoes in various forms and just eat them all day.

These potatoes were delicious! I have to say though, that the best ones were the ones that got left in the skillet while we were eating dinner and continued soaking up the creamy ranch sauce. Mmmmm.... SO. GOOD.

This is a fantastic (and super yummy) side dish that was easy to make and can go with all types of meals!

Creamy Skillet Potatoes
Taste of Home: Everyday Light Meals
Published by Reiman Media Group, LLC in 2010.

Prep/Total time: 30 minutes  Yield: 8 servings

7 cups cubed uncooked red potatoes
1/3 cup chopped onion
2 tbsp all-purpose flour
1 envelope (1 ounces) ranch salad dressing mix
1/2 tsp dried parsley flakes
1/4 tsp salt
1/4 cup reduced-fat sour cream
2 cups fat-free milk

1. Place 1 in. of water and potatoes in a large nonstick skillet; bring to a boil. Reduce heat; cover and simmer for 10 minutes or until tender; drain. Coat skillet with nonstick cooking spray; add potatoes and onion. Cook over medium-high heat for 5-7 minutes or until golden brown.
2. In a saucepan, combine the flour, salad dressing mix, parsley and salt. Stir in the sour cream. Gradually add the milk, stirring until blended. Bring to a boil; cook and stir for 2 minutes or until thickened. Pour over potatoes; toss to coat.

Spinach Turkey Roll


Mmm this was pretty tasty! Mostly easy, good flavor... I say mostly easy because I had a little trouble rolling everything up. The recipe calls for you to "roll up jellyroll style." I just thought that sounded a little silly. I've never had to roll anything up "jellyroll style." But, it didn't seem so silly when it came time to do it - that wasn't the easiest thing I've ever had to do! It was definitely a two-person effort. My husband had to help me, but we got it done and it turned out great! Those potatoes you see in the second photo were paired with this recipe in my cookbook - I'll post that recipe next!

Spinach Turkey Roll
Taste of Home: Everyday Light Meals
Published by Reiman Media Group, LLC in 2010.

Prep time: 25 minutes  Bake time: 50 minutes  Yield: 6 servings

1 cup meatless spaghetti sauce, divided
2 eggs, lightly beaten
1 cup soft whole wheat bread crumbs
1/4 cup finely chopped onion
2 garlic cloves, minced
1 tsp dried basil
1 tsp dried oregano
1 tsp ground mustard
1 pound lean ground turkey
1 package (10 ounces) frozen chopped spinach, thawed and squeezed dry
1/2 cup shredded part-skim mozzarella cheese

1. In a bowl, combine 1/4 cup spaghetti sauce, eggs, bread crumbs, onion, garlic, basil, oregano and mustard. Combine turkey over mixture and mix well.
2. On a sheet of waxed paper, pat turkey mixture into a 12-in. x 8-in. rectangle. Sprinkle with spinach and cheese. Roll up jellyroll style, starting with a short side and peeling waxed paper away while rolling. Seal seam and ends. Place seam side down in a 15-in. x 10-in. x 1-in. baking pan coated with nonstick cooking spray.
3. Bake, uncovered, at 350°F for 50-60 minutes or until a meat thermometer reads 165°F. Let stand for 5 minutes before slicing. Heat remaining spaghetti sauce; serve over turkey.

Julia Child's Eggplant Pizzas


Ok, I'm going to be honest with you guys. I've been on a bit of a blog hiatus for the past 3 weeks. I have still been cooking new recipes, but I haven't been posting them in the blog. Therefore, I'm about 8 recipes behind in my posting. So what I'm going to do for the next 8 posts is just post the pictures and the recipes and maybe a few comments. My hope is that once I catch up today, then I'll get back into the swing of things and give you guys some posts worth reading. :-) Enjoy.

I was first drawn to this particular recipe because it is a Julia Child recipe and I'm pretty much in love with her. It was very good! Not super filling though, so you definitely need to fix something on the side to go with it, or just make more of it. I had one (large) eggplant for four people and it just wasn't quite enough.

Julia Child's Eggplant Pizzas

Yield: 3-4 servings or 6-8 appetizer servings

1 globe eggplant, about 8 ounces and 9-10 inches long
about 1 tbsp salt, for drawing water out of eggplant
about 2 tbsp olive oil, for brushing eggplant before roasting
about 2 tsp dried Italian seasoning, for sprinkling on eggplant before roasting
10 large basil leaves, cut in chiffonade strips (optional)
1/3 cup freshly grated Parmesan
1/3 cup finely grated low-fat mozzarella blend
hot red pepper flakes for sprinkling finished pizza (optional)

Sauce Ingredients:
2-3 tsp extra-virgin olive oil
3 large garlic cloves, very finely chopped
1 can good quality petite diced tomatoes with liquid (or use 3 cups peeled and diced fresh tomatoes)
1/2 tsp dried Italian seasoning blend
1/4 tsp dried oregano

1. Cut off both ends of the eggplant; then cut it into 3/4 inch thick slices (trying to make them the same thickness). Put the eggplant pieces on a double layer of paper towels and sprinkle both sides generously with salt. Let the eggplant sit with the salt on it for about 30 minutes to draw out the liquid. (After the eggplant sits for 15 minutes, turn on the oven to 375°F)
2. While the eggplant sits, make the sauce. Heat 2-3 tsp olive oil (depending on your pan) and saute the finely chopped garlic just until it becomes fragrant. (Don't let it brown.) Add the petite diced tomatoes, dried Italian seasoning, and dried oregano and let the sauce cook at a low simmer until it's thickened, breaking up the tomatoes with a fork as it cooks. (Add water as needed, a few tbsp at a time as the sauce cooks, keeping it hot by simmering at very low heat until it's needed for the eggplant slices.)
3. After 30 minutes, wipe the eggplant dry with paper towels (this also removes most of the salt.) Spray a roasting sheet with olive oil or non-stick spray, lay eggplant slices on; brush the tops of the eggplant with olive oil, and sprinkle with dried Italian seasoning. Roast the eggplant about 25 minutes (but "not so long that the slices become mushy and lose their shape" as Julia says.)
4. While the eggplant roasts, thinly slice the fresh basil leaves (if using) and combined freshly grated Parmesan and low-fat mozzarella blend. After 25 minutes or when eggplant pieces are done, remove eggplant from the oven and turn oven setting to broil. Spread a few tbsp of sauce on the top of each eggplant slice, sprinkle with thin basil slices (if using) and top with a generous amount of cheese. Put pizzas under the broiler until the cheese is melted and slightly browned. Serve hot, with red pepper flakes to sprinkle on pizza if desired.

Tuesday, September 11, 2012

Beef and Rice Casserole


I have only done a few crock pot meals in the past, but have generally steered away from them because I haven't had much success with the ones that I've tried. I'm not sure what it was, but I just didn't really like the few crock pot recipes that I've tried before. This dish has changed my way of thinking! For only five ingredients and hardly any effort, this was delicious!

You can't go wrong with this recipe! Again, for only five ingredients, this dish was packed with flavor. I did end up adding a little more salt than the recipe called for, and I also added some black pepper as it was cooking. I put the slow cooker on low, as instructed, but the rice was already cooked through after 4 hours, so I just kept adding a little water and stirring everything up over the next 2 hours until we were ready to eat. That worked just fine! The hardest part about this recipe was the fact that the house smelled amazing all afternoon as it cooked in the crock pot and I had to keep myself from going into the kitchen over and over and stealing little bites.

Enjoy!

Six Ingredients or Less
Published by CJ Books in 2001.

Total time: 6-7 hours  Yield: 8 servings

1 1/2 pounds lean ground beef
1 1/2 cups chopped onion
1 1/2 cups uncooked long-grain rice
1 can (10 3/4 oz) condensed cream of celery soup
1 can (10 3/4 oz) condensed cream of mushroom soup
1 teaspoon salt

1. In a medium skillet, brown ground beef and onion; drain. Place in slow cooker. Add remaining ingredients along with 2 soup cans of water. Cover and cook on low 6 to 7 hours, or until liquid is absorbed and rice is tender, but not overcooked.

Monday, September 10, 2012

Beer Bean-Stuffed Poblano Peppers


I have done several different stuffed peppers recipes over the last year. I'm starting to think it might be one of my favorite things to make. Definitely in the top 3. I posted another stuffed peppers recipe (see here) last December, and I completely fell in love with that one and have made it many times since then. This Beer Bean-Stuffed Peppers recipe is a close competitor! This was really, very delicious!

I altered the recipe slightly. First, as you can see, I have green bell peppers instead of poblano peppers. There were no poblano peppers to be found at the grocery store yesterday, but the green bell peppers worked just fine. The recipe calls for you to cut a slit in the poblano peppers and stuff everything inside of them, but because that would have been difficult with the green bell peppers, I decided to cut them in half and do this recipe in an open-face style.

Because I cut the peppers like this, I cooked them in the oven a little differently from how the recipe says to do it. With the stuffing and cheese exposed directly to the heat, I didn't want all of that to dry out or burn, so instead of stuffing it all and sticking it in the oven for 25 minutes, I first just put the peppers alone in the oven (still used the suggested heat of 425°F) for 10 minutes to let them roast a bit, then I filled the peppers with the stuffing, holding off on the cheese, and cooked them for another 10 minutes, and then in the last 5 minutes, I added the cheese.

A few alterations to the ingredients: I used canned beans instead of dried beans, and in an effort to try to save some money, I just used a chipotle rub seasoning that I had at the house instead of buying chipotle chiles in adobo, I did not get/use the feta cheese, and just used a shredded Mexican cheese blend that we already had at the house instead of the shredded jack cheese. I thought it all worked out just perfect!

I was really happy with how these turned out. There was a lot of flavor packed into those peppers! I especially liked the combination of the chipotle and cinnamon flavors. A combination I would not have thought of on my own, but having those contrasting flavors really added a lot to the dish! Plus it smelled fantastic as it was all cooking!

If do you make this dish, make sure to go to the actual website where I got the recipe from. She posted some notes at the end that you might want to check out, such as if you use canned beans, you don't have to add the 2 1/2 cups of water and let the beans simmer. Enjoy!

Beer Bean-Stuffed Poblano Peppers

Total time: about 1 hour  Yield: 4 servings

Beer beans
1/2 pound dried black beans, picked over and rinsed (or 1 can of cooked beans; you'll need about 2 cups, cooked)
1 tsp olive oil
1 yellow onion, chopped
2 cloves garlic, minced
12 ounces Mexican beer
1 canned chipotle chile in adobo, chopped (or 1/2 tsp chipotle chile powder)
scant 1/2 tsp ground cinnamon
sea salt
Peppers
6 poblano chiles
1 cup crumbled cotija or feta cheese
1 cup shredded Jack cheese
juice of 1/2 lime
1 cup cherry tomatoes, chopped
1 tbsp olive oil
1/2 cup chopped fresh cilantro

1. In a large bowl, soak the beans in plenty of water for at least 6 hours, or up to overnight.
2. Drain the beans and set them aside. In a large pot over medium heat, add the olive oil, onion, and garlic and saute for a few minutes, until the onion is just softened.
3. Add the soaked beans and 2 1/2 cups water, stir, and bring the beans to a simmer. Simmer until the beans are cooked through (but not totally tender), 45 minutes to 75 minutes. Add the beer, chipotle and cinnamon and simmer until much of the liquid is absorbed, around 20 minutes. If necessary, add some water to keep the beans from drying out. Add 1/2 to 3/4 tsp salt, to taste, and cook for another 10 minutes. Preheat the oven to 425° and set the beans aside.
4. Grease a large baking dish or cast iron skillet. Cut a slit down the length of each poblano. Use your fingers (you might want to wear gloves) and a paring knife to remove, and then discard, the membranes and seeds from each pepper.
5. In a bowl, mix together the shredded Jack and crumbled cotija/feta cheese with the lime juice. If there is still a good amount of liquid in your beans, drain off some of it. Mix the chopped tomatoes into the beans. Use a spoon to fill most of each pepper with beans, then stuff a handful of cheese inside. Brush the outside of each pepper with olive oil and bake for around 25 minutes, until the tops are roasted and golden and the pepper is tender all around. Serve peppers immediately, with the slit side up and garnished with cilantro.

Tuesday, September 4, 2012

Salmon Cakes


Mmm Mmm Mmm!!!

About 7 months ago, I made some crab cakes that turned out phenomenal. These salmon cakes are right up there! These were terrific! (That red sauce you see on the plate in the 2nd photo is Sriracha sauce - my husband puts that stuff on everything!)

Honestly, it was a week and a half since I made these, so I'm having a little trouble remembering how the cooking process was for these. The last few weeks seem to have run all together for me! I did do some of the prep beforehand so that there wouldn't be as much to do when it came time to fix dinner. That helped a lot. I'm not the fastest person in the world when it comes to prep work, such as chopping, dicing, etc, so getting some of that done beforehand cut my time in the kitchen at dinnertime down significantly.

One thing I did differently from the recipe posted below is that instead of using a fresh salmon filet and going through the whole baking process, I just bought canned salmon. That really simplified the recipe, and it was still delicious! I also just used some packaged bread crumbs instead of processing loaf bread and toasting it in the oven, which also cut down on the time.

There was so much flavor in these salmon cakes! They were absolutely delicious, and definitely something I'll be making again. You don't want to miss out on this recipe! Give it a try!

Salmon Cakes

Prep time: 30 minutes  Inactive: 1 hr  Cook time: 50 minutes

Yield: 5 servings

1/2 pound fresh salmon
good olive oil
kosher salt and freshly ground black pepper
4 tbsp unsalted butter
3/4 cup small-diced red onion (1 small onion)
1 1/2 cups small-diced celery (4 stalks)
1/2 cup small-diced red bell pepper (1 small pepper)
1/2 cup small-diced yellow bell pepper (1 small pepper)
1/4 cup minced fresh flat-leaf parsley
1 tbsp capers, drained
1/4 tsp hot sauce (recommended: Tabasco)
1/2 tsp Worcestershire sauce
1 1/2 tsp crab boil seasoning (recommended: Old Bay)
3 slices stale bread, crusts removed
1/2 cup good mayonnaise
2 tsp Dijon mustard
2 extra-large eggs, lightly beaten

1. Preheat the oven to 350°F.
2. Place the salmon on a sheet pan, skin side down. Brush with olive oil and sprinkle with salt and pepper. Roast for 15 to 20 minutes, until just cooked. Remove from the oven and cover tightly with aluminum foil. Allow to rest for 10 minutes and refrigerate until cold.
3. Meanwhile, place 2 tbsp of the butter, 2 tbsp olive oil, the onion, celery, red and yellow bell peppers, parsley, capers, hot sauce, Worcestershire sauce, crab boil seasoning, 1/2 tsp salt, and 1/2 tsp pepper in a large saute pan over medium-low heat and cook until the vegetables are soft, approximately 15 to 20 minutes. Cool to room temperature.
4. Break the bread slices in pieces and process the bread in a food processor fitted with a steel blade. You should have about 1 cup of bread crumbs. Place the bread crumbs on a sheet pan and toast in the oven for 5 minutes until lightly browned, tossing occasionally.
5. Flake the chilled salmon into a large bowl. Add the bread crumbs, mayonnaise, mustard, and eggs. Add the vegetable mixture and mix well. Cover and chill in the refrigerator for 30 minutes. Shape into 10 cakes.
6. Heat the remaining 2 tbsp butter and 2 tbsp olive oil in a large saute pan over medium heat. In batches, add the salmon cakes and fry for 3 to 4 minutes on each side, until browned. Drain on paper towels; keep them warm in a preheated 250°F oven and serve hot.


Thursday, August 23, 2012

Asparagus Pasta


This recipe will definitely go on my list of things to make again very soon! What a tasty meal! I know it doesn't look like a whole lot in the picture, but don't let your eyes deceive you - this was really, really good!

This is supposed to be a vegetarian meal, which I had every intention of keeping it that way, but at the last minute I made the decision to throw some shrimp in there. I was going to be working out right before dinner, and I wanted to have more protein in the dish. The addition of the shrimp was terrific, but I could tell that it would have been just as good without it.

The sauce is what really tied everything together. It gave the meal a very light, refreshing, feel and taste to it. I added a little extra lemon juice than what the recipe called for. I made it as instructed, but I didn't think the lemon flavor was coming through enough, so I just added, mixed, and tasted until I had it just how I wanted it. Delicious! I also didn't shave my asparagus stalks - I just chopped them up.

My husband is actually the one that cooked this meal tonight! I have found a group to run with on Wednesday nights. They meet at 6:30pm, so it is about 7:30pm by the time I get home. I did some prep work before I left, but he put it all together, and he said it was very easy and didn't take hardly any time at all! This really is an excellent easy, healthy, no fuss dinner that the whole family will enjoy!

Asparagus Pasta

Total time: about 20 minutes  Yield: 4 servings

4 servings penne pasta
10 large asparagus stalks (about 1/2 pound) - at Food Lion, they sell asparagus by the bunch, and I just used that whole bunch
1/2 cup green onions, diced
1 tbsp olive oil
Coating:
1/4 cup olive oil
2 tbsp lemon juice
zest from one lemon
1/2 cup basil, loosely packed
1/4 cup garlic scapes
1/4-1/2 cup Parmesan (optional)

1. Using either a mandolin or vegetable peeler, shave asparagus into strips. Cut tips off and either toss in pasta dish or save for later use.
2. Begin boiling a large pot of water with a pinch of salt.
3. In a skillet, heat olive oil over medium heat. Add in green onions and saute for 2 minutes. Stir in asparagus, cover, and continue to cook, stirring frequently until tender.
4. While asparagus cooks, combine ingredients for coating in a small food processor and pulse until well combined adding more olive oil or lemon juice as needed.
5. Once the water is boiling, add in the pasta. Once pasta is cooked, drain and add to the pan of cooked asparagus along with the basil coating.
6. Serve with an extra sprinkle of Parmesan cheese and basil.

Tuesday, August 21, 2012

Caprese Chicken


Yum! This was delicious! What an excellent blend of flavors and textures - and it was quite healthy too!

I altered this recipe a little bit, but hardly at all. The recipe calls for thin-cut boneless, skinless chicken breast halves. I have a couple packages of regular chicken breasts in the freezer, and as you know, chicken breasts generally come in packages of three. I was cooking for four people tonight, but I didn't want to defrost two whole packages of chicken, and the chicken breasts were also pretty large. So what I did was marinate the three chicken breasts as instructed, and then I sliced them all up before I cooked them in the grill pan. Then I divided that all up 4 different ways and topped each plate of chicken with the tomato mixture. Worked out perfect!

Enjoy!


Chicken:
1 (8 oz) container plain yogurt
3 tbsp balsamic vinegar
8 thin-cut boneless, skinless chicken breast halves (about 1 1/2 pounds total)

Tomato-Mozzarella Topping: 
1 tbsp extra-virgin olive oil
1 medium-size onion, cut into 16 wedges
1/4 cup balsamic vinegar
2 tbsp water
1 pound plum tomatoes, cored, seeded and chopped (about 4 cups)
1 tsp salt
1/2 tsp black pepper
8 oz fresh mozzarella cheese, cut into 1/2-inch cubes
1 cup loosely packed fresh basil leaves, chopped

1. For the chicken: in a small bowl, whisk together the yogurt and balsamic vinegar until blended. In a plastic food-storage bag, combine chicken and yogurt mixture. Seal and turn the bag to coat. Marinate in the refrigerator for 20 minutes.
2. Meanwhile, heat a gas grill or grill pan to medium-high.
3. For the tomato-mozzarella topping: in a large skillet, heat oil over medium heat. Add the onion and saute about 5 minutes or until onion is slightly softened and the wedges fall into pieces. Add the balsamic vinegar and water. Bring to a simmer. Reduce heat to medium-low; cook about 7 minutes until liquid is reduced and onion is tender. 
4. Increase heat to medium-high and add tomatoes, salt and pepper. Cook for 2 minutes and remove from the heat Let mixture cool for 2-3 minutes then stir in mozzarella cubes and basil gently.
5. Remove chicken from bag. Discard marinade. Gently rinse chicken and pat it dry with paper towels.
6. Spray grill with cooking spray or coat with oil. Grill for 6-8 minutes per side. Serve immediately. Serve chicken on platter with topping in the center and let guests spoon their topping on.


Roasted Corn and Ricotta Enchiladas with Chipotle Tomato Sauce


I've mentioned before that I try to have at least one vegetarian dinner each week (this week we're having two!). This was pretty good for a vegetarian meal! It had kind of a different taste to it. I think it was the mixture of lime juice and honey. I wasn't super crazy about it, but it was still good!

I guess I don't have a whole lot to say about this one. It was good and easy to fix. It can easily be doubled or tripled to serve more people. I'll probably go through a few other recipes before I fix this one again though. See for yourself - maybe you'll love it!


Total time: 55 minutes  Yield: 2 servings

Filling:
2 large ears sweet corn
1/2 tbsp olive oil
1/8 tsp salt
1 cup ricotta
1 tbsp honey
1 tbsp lime juice
1/4 cup cilantro
Sauce:
2 large slicing tomatoes
2 cloves garlic, minced
1 tbsp olive oil
1/2-1 tsp chipotle powder
1/4 tsp salt
6-8 corn tortillas
1/2 cup queso fresco cheese (or other favorite cheese)

1. Preheat oven to 375°F.
2. Carefully remove corn from cob by placing the cob perpendicular to the bottom of a large bowl. Cut downward on the cob. Toss kernels with 1/2 tbsp olive oil and 1/8 tsp salt. Roast, stirring occasionally, until soft, 15-20 minutes.
3. In a medium bowl, whip together ricotta, honey, lime juice, and cilantro. Once corn is done, stir into ricotta mixture.
4. To make sauce, heat 1 tbsp olive oil over medium low heat. Add in minced garlic and saute for 1-2 minutes. Roughly dice tomatoes and add into pot along with chipotle powder and salt. Cook until tomatoes are starting to break down. Remove from heat and blend with an immersion blender or a regular blender.
5. Layer tortillas in between a damp towel and either place in the microwave or oven for a couple minutes until pliable.
6. To assemble enchiladas, use an 8x5 pan (or an 8x8 with extra space). Place 1/3 of the chipotle tomatoes in the bottom of the pan. Next, scoop 1/3-1/2 cup corn filling in to the center of the tortillas, roll gently, and place seam side down in the pan. Repeat with remaining tortillas, carefully squeezing the last tortillas in. Pour remaining sauce on top and sprinkle over queso fresco cheese.
7. Bake enchiladas until lightly browning and bubbly, 20-25 minutes.

Pumpkin Cupcakes with Cinnamon-Cream Cheese Frosting


OH. MY. GOD.

I'm going to have trouble writing this post for two reasons. First, these cupcakes were so beyond delicious that I don't know if there are any words I could use to describe how amazing they are. And second, I'm having trouble stopping myself from eating them long enough to type this post!

Although it is still August, I'm getting antsy for the fall season to get here. I love fall! The changing colors in the leaves, fall seasonal beers (♥ Sam Adams Octoberfest!), football, caramel apple cider, and ALL THINGS PUMPKIN! I was having a particular hankering for pumpkin this past Sunday, so I thought I'd get a jump start on the fall season and go ahead and make some yummy pumpkin cupcakes. What an excellent decision that was!

The cupcake recipe I used included a salted caramel buttercream frosting, and while I'm sure that would be really good, I wanted a cream cheese frosting. Below I'll list both websites where I got each recipe. The cupcakes turned out perfect! They have just the right level of moisture - just moist enough that you want to melt where you're standing when you take a bite, but not so moist that it sticks to the roof of your mouth or in your teeth. And the flavor - oh my, the flavor! The pumpkin flavor really stands out, but not overly so. Sometimes pumpkin flavored things can be much too sweet, but that isn't the case here. And the frosting recipe I used paired perfectly with the cupcakes! The frosting is also not overly sweet, and the flavors of both the cupcakes and the frosting blend together beautifully. My mouth is watering just thinking about them... Oh wait that's right, we've almost already eaten them all!

You need to make these ASAP! I'm demanding it! :-)

Pumpkin Cupcakes

Yield: about 18 cupcakes

2 cups all-purpose flour
1 teaspoon baking soda
1 teaspoon baking powder
1 teaspoon coarse salt
1 teaspoon ground cinnamon
1 teaspoon ground ginger
1/4 teaspoon freshly grated nutmeg
1/4 teaspoon ground allspice
1 cup packed light-brown sugar
1 cup granulated sugar
1 cup (2 sticks) unsalted butter, melted and cooled.
4 large eggs, lightly beaten
1 can (15 ounces) pumpkin puree

1. Preheat oven to 350°. Line cupcake pans with paper liners; set aside. In a medium bowl, whisk together flour, baking soda, baking powder, salt, cinnamon, ginger, nutmeg, and allspice; set aside.
2. In the bowl of a stand mixer, fitted with the paddle attachment, combine the brown sugar, granulated sugar, butter, and eggs. Beat on medium speed until well combined. Add dry ingredients, and mix on low until smooth. Fold in pumpkin puree.
3. Divide batter evenly among liners, filling each about halfway. Bake until tops spring back when touched, and a cake tester inserted in the center comes out clean, 20 to 25 minutes, rotating pans once if needed. Transfer to a wire rack; let cool completely.

Cinnamon-Cream Cheese Frosting

1 pkg. (8 oz) cream cheese, softened
1/4 cup butter, softened
1 tsp vanilla
1 pkg. (16 oz) powdered sugar
1 1/2 tsp ground cinnamon

1. Beat cream cheese, butter and vanilla in large bowl with mixer until blended. Gradually beat in sugar. Blend in cinnamon. Spread over cupcakes.

Monday, August 13, 2012

Turkey Pesto Meatloaf Recipe with Tomato Sauce


I have to say, out of the four recipes that I've posted tonight from the past week, this one was my favorite! I love a good meatloaf, and this was a GOOD meatloaf!

The sauce that was basted on top of the meatloaf really sealed the deal for me. I probably could have just drank that bowl full of sauce. It was such a simple mixture too - Classico tomato and basil sauce mixed with some balsamic vinegar - YUM! The meatloaf alone was delicious, but the sauce really put this recipe on another level.

When I first saw this recipe, it grabbed my attention because of the pesto. I've never heard of adding pesto to meatloaf. I know some people aren't huge pesto fans, but the flavor wasn't overwhelming by any means, and in fact blended together quite well with the ground turkey. Again, once you tasted the the flavor of the sauce and how perfectly the flavors matched the rest of the meatloaf, you don't think about much else besides how sad you will be once all of the meatloaf is gone because it is SO GOOD! :-)

I whipped up some scratch mashed potatoes to go along on the side. How can you have meatloaf without mashed potatoes? An excellent meal for the whole family!

Turkey Pesto Meatloaf Recipe with Tomato Sauce

Yield: 6 servings

2 tsp olive oil
1 onion, finely diced
1 tbsp finely minced garlic
1 1/2 lbs lean ground turkey
1/4 cup basil pesto
2 tbsp finely grated Parmesan cheese
1/2 tsp salt
3/4 cup 100% whole wheat breadcrumbs
1/4 cup low-sugar marinara sauce (I used Classico tomato and basil sauce)
2 tsp balsamic vinegar

1. Take the turkey out of the fridge and let it come to room temperature while you prep the other ingredients. Preheat oven to 350°F. Spray a roasting pan with olive oil or nonstick spray (preferably a pan with some slits to let any extra fat drip out.)
2. Heat the olive oil in a frying pan and saute the onion with medium-high heat until it's starting to slightly brown, about 7-8 minutes. Add the garlic, lower heat slightly, and saute about 2 minutes more.
3. Using a bowl that's large enough to get both hands into it, combine the ground turkey, sauteed onion and garlic, pesto, Parmesan cheese, salt, and whole wheat breadcrumbs. Use clean hands to mix the ingredients, just until they are combined.
4. Form the mixture into a loaf shape and place on the roasting pan.
5. Bake meatloaf for 40 minutes. While it bakes, stir together the marinara sauce and balsamic vinegar and after 40 minutes use a pastry brush to brush it onto the meatloaf, until it's completely covered with sauce. Continue to bake, brushing with more sauce a few more times if you have some left, until a meat thermometer shows a temperature of 160°F. I cooked my meatloaf for a total time of one hour and twenty minutes before it got to that temperature. Serve hot.

Orecchiette with Spinach, Sausage & Tomatoes


This was a perfect weeknight meal - quick, easy and tasty! We strayed from the recipe some on this one. While it isn't a complicated recipe, I thought the cookbook was trying to make it more complicated than it needed to be. I will post the recipe below like I always do, but I will tell you here what I actually did to fix it.

1) Brown the sausage in a skillet, 2) Cook the pasta according to package, 3) Drain the pasta, then put it back in the same pot, adding the sausage, drained cans of tomatoes, pressed garlic, crushed red pepper flakes, spinach leaves and Parmesan cheese, 4) Heat together and mix until spinach wilts.

I thought that my version was simpler than the cookbook's version, but I will list their's below and you can decide for yourself! I got some grape tomatoes, but when the time came to fix this recipe, they had started to go bad, so I just left them out. As much as I LOVE tomatoes, I really don't think this recipe even needed them since you already have a few cans of diced tomatoes. I'd say that the grape tomatoes are optional.

A few notes from the cookbook: 1) Breaking the sausage into crumbles with the Mix 'N Chop helps it to cook more quickly and evenly, 2) Orecchiette means "little ears" in Italian. It is a small round pasta with a slight dome in the center. Companelle pasta can be substituted, if desired, and 3) For a milder dish, mild or sweet Italian sausage can be used. Italian sausage links with the castings removed can be substituted for the bulk sausage.

Enjoy!

Orecchiette with Spinach, Sausage & Tomatoes
Pampered Chef 29 Minutes to Dinner, Volume 2
Published by The Pampered Chef, Ltd. in 2009.

Total time: 28 minutes  Yield: 6 servings

1 1/4 lb bulk hot Italian sausage
3 cans (14.5 oz each) Italian-herb diced tomatoes, divided
12 oz uncooked orecchiette pasta
1 1/2 cups water
4 garlic cloves, pressed
1 tsp crushed red pepper flakes (optional)
1/2 tsp salt
2 cups grape tomatoes
1 oz Parmesan cheese, grated (about 1/4 cup packed)
5 oz fresh baby spinach leaves (8 cups)

1. Cook sausage in (12-in.) Skillet over medium-high heat 8-10 minutes, breaking into crumbles with Mix 'N Chop. Drain canned tomatoes using large Colander into large bowl; reserve 1 cup of the tomato liquid for later use in the recipe.
2. Add drained canned tomatoes, tomato liquid from large bowl, pasta, water, pressed garlic, pepper flakes, if desired, and salt to Skillet. Cover and cook 13-15 minutes or until pasta is tender, stirring occasionally.
3. Meanwhile, cut grape tomatoes in half using Utility Knife. Grate cheese using Microplane Adjustable Grater. Add grape tomatoes, spinach and reserved 1 cup tomato liquid to Skillet. Cook 1-2 minutes or until spinach is wilted, stirring constantly. Sprinkle with cheese.

Tomato Cobbler with Blue Cheese Biscuits


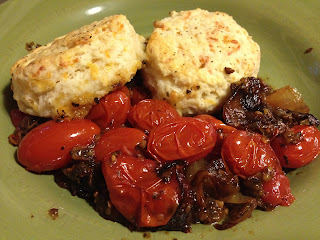
Heck YES I made biscuits from scratch for the first time! And they were good! :-)

I was quite happy with how this dish turned out. I was doing my weekly menu planning on Sunday morning and came across this recipe online. The title immediately grabbed my attention. Tomato Cobbler? What? I've never heard those two words used together, ever. We have all been missing out!

To quote the blogger who posted this recipe, this dish was dang good. Of course I love all of the ingredients... scratch biscuits - good, caramelized onions - good, balsamic vinegar - good, tomatoes -good... well, you get the point. And all of that brought together was simply amazing. I did use shredded cheddar in the biscuits instead of blue cheese crumbles, and I probably could have eaten them all by myself.

This one took a little longer than I thought it would from beginning to end (that seems to happen to me a lot), but it was totally worth it. And this may seem like a odd recipe to make for a dinner to some of you, but it was truly bursting with flavor and more filling than you'd expect. We had a little side salad to go along with it and were very satisfied! Go ahead, branch out try something a little out of the ordinary for dinner! You won't be sorry!


Yield: 6 servings

For the Biscuits:
2 cups all-purpose flour
2 tbsp baking powder
1 tbsp granulated sugar
1/2 tsp salt
1/2 tsp coarse ground black pepper
3 tbsp unsalted butter, cold and cut into cubes
3 tbsp vegetable shortening, cold and cut into cubes
1/2 cup blue cheese crumbles
3/4 cup cold buttermilk

For the Filling:
2 tbsp olive oil
1 tbsp unsalted butter
2 large onions, sliced
3 cloves garlic, minced
2 tbsp balsamic vinegar
2 pounds cherry tomatoes
1/4 cup coarsely chopped basil
3 tbsp all-purpose flour
1/2 tsp red pepper flakes
salt and coarsely ground black pepper

To make the Biscuits:
1. In a medium bowl, whisk together flour, baking powder, sugar, and salt. Add cold butter and shortening. With your fingers, quickly break up the fat into the dry ingredients. Rub the fats into the dry ingredients until well incorporated. Some butter pieces will be the size of small peas, others will be the size of oat flakes. Toss in blue cheese crumbles. Stir to incorporate.
2. Create a small well in the center of the flour mixture. Add buttermilk all at once. With a fork, quickly bring together the wet and dry ingredients. The dough will be rather shaggy. Dump dough out onto a lightly floured work surface. Knead dough about 10 times, bringing it together into a disk. Wrap dough in plastic wrap and refrigerate until the filling is assembled.

To make the tomato Filling:
3. Add olive oil and butter to a medium saute pan over medium heat. Add sliced onions and season with salt and pepper. Cook and brown onions, stirring occasionally, until caramelized, about 18-20 minutes. Add garlic and cook for one minute more. Remove pan from heat, add balsamic vinegar and set aside.
4. In a large bowl, toss together clean cherry tomatoes (no need to cut them), chopped basil, flour, and red pepper flakes. Add caramelized onions and toss together until everything is lightly and evenly coated in flour. Season with salt and pepper.
5. Place rack in the upper third of the oven and preheat oven to 375 degrees F.
6. Pour the tomato and onion filling into a square 8 x 8-inch baking dish. Place in the oven and bake tomatoes filling for 25 minutes.
7. Remove the biscuit dough from the fridge. On a lightly floured work surface, roll out biscuit dough into a 3/4 or 1-inch thickness. Use a 1 1/2 to 2-inch round biscuit cutter to cut out biscuits. Dip the cutter in flour should it get sticky. Remove the partially cooked filling from the oven and carefully place 6 biscuits atop the tomato filling in the pan. Brush biscuit tops with buttermilk and sprinkle with salt and pepper. Reshape and reroll excess biscuit dough to make extra biscuits at another time. (The shaped biscuit dough freezes very well.)
8. Return warm filling and biscuit dough to oven and bake for 17-20 minutes, until the biscuits are golden brown and cooked through, and the tomato mixture is bubbling.
9. Remove from the oven and allow to cool for about 15 minutes before serving. Tomato Cobbler is best served warm.


Grilled Fish Tacos


I took two pictures - one of my fish tacos, and one of the picture in the cookbook of the fish tacos. I think that I was so hungry by the time dinner was ready and I was getting my picture, that I didn't take as much time and care as I usually do to get a good picture of the dish, which resulted in a terrible picture. My picture doesn't do the recipe justice - it was a delicious meal!

The cookbook says that this recipe only takes 24 minutes to fix. That is a lie. I think a big reason why it took me so long to fix is because it took me a while to cut everything up. Once everything is prepped, it didn't take long to fix, but that was a major part of the process. The fish didn't take long to cook at all. The grocery store didn't have any cod, so I got tilapia instead. It tasted excellent! Just seasoning the tilapia with a little bit of black pepper was perfect - the flavor of the fish really came through and tasted great!

The sauce was really good as well. As I was putting each taco together, I wasn't sure how far the sauce would go, so I only put a little on each taco. I ended up having plenty left over, and I think the tacos could have used a little more sauce, so don't be shy with it when you're putting it all together. 

A few notes from the cookbook: 1) Napa cabbage is a mild-flavored cabbage with tight, compact head of yellow green leaves that are ruffled at the top, 2) Shredded cabbage is traditionally served in fish tacos. Here, napa cabbage is used for its lacy and tender texture, but the more readily available green cabbage can be used, and 3) If desired, tilapia fillets can be substituted for the cod fillets.

I roasted some zucchini and squash to go with the main dish. I love roasting vegetables! All you have to do is brush a little olive oil on the veggies, sprinkle them with some salt and pepper, and pop them in the oven at around 400° or so until they start browning - delicious! Overall, a healthy, wonderful meal that you don't want to miss out on! Give it a try!

Grilled Fish Tacos
Published by The Pampered Chef, Ltd. in 2009.

Total time: 24 minutes  Yield: 4 servings

2 limes, divided
2 plum tomatoes, seeded
1 small onion
1/3 cup snipped fresh cilantro
1/2 cup mayonnaise
2 tbsp milk
1 garlic clove, pressed
1/4 tsp salt
2 cups thinly sliced Napa cabbage, green tips only
1 avocado
8 (6-in.) corn tortillas
1 lb skinless cod fillets
1/4 tsp coarsely ground black pepper

1. Juice limes using Juicer to measure 1/4 cup juice. Dice tomatoes and chop onion using Santoku Knife. Snip cilantro using Kitchen Spears. For sauce, in Small Batter Bowl, combine 2 tbsp of the lime juice, mayonnaise, milk and pressed garlic; whisk until smooth. For salsa, combine remaining lime juice, tomatoes, onion, cilantro and salt in Classic Batter Bowl; mix well. Thinly slice cabbage. Peel, seed and thinly slice avocado.
2. Heat Grill Pan over medium-high heat 3 minutes. Lightly spray tortillas with vegetable oil using Kitchen Spritzer. Place half of the tortillas onto pan; cook 2-3 minutes or until lightly browned, turning once using Saute Tongs. Place tortillas in Large Micro-Cooker; cover and keep warm. Repeat with remaining tortillas.
3. Lightly spray same pan with vegetable oil using Kitchen Spritzer. Season cod with black pepper. Place cod onto pan; cook 5-8 minutes or until cod flakes easily with a fork, turning once. Remove cod from pan, flake into bite-size pieces. Top tortillas with cabbage, cod, sauce, salsa and avocado slices as desired.


Thursday, August 2, 2012

Pork Tenderloin with White Bean Salsa


Oh man, check out how thick those pork chops are! I've been buying pork chops from Food Lion for years now and I don't think I've ever seen ones so thick before. I decided to just get some pork chops instead of a pork tenderloin for this recipe. They came out very juicy cooking them in the grill pan!

Another small change I made to the recipe was that I used turkey bacon instead of real bacon. Real bacon is a wonderful treat to have every once in a while, but I was trying to keep the recipe healthy so I used turkey bacon. Turkey bacon has a great flavor to it! Real bacon will always have a special place in my heart, but I'm just as happy having turkey bacon. Give it a try sometime! You'll probably be surprised at how good it is!

I was pretty curious how the salsa mixture was going to taste.... salsa with bacon? Genius! How have I been missing out on this my whole life? Everything mixed together was so good! The salsa mixture alone was bursting with flavor, but then paired with the Jamaican Jerk seasoned pork chops was fantastic! Another successfully delicious dinner!

Pork Tenderloin with White Bean Salsa
Pampered Chef Latin Flavor
Published by The Pampered Chef, Ltd. in 2008.

Prep time: 15 minutes  Total time: 32 minutes  Yield: 8 servings

2 pork tenderloins (1 lb each)
2 tbsp Chipotle Rub or Jamaican Jerk Rub
1/2 small onion
1 tbsp chopped fresh cilantro
6 slices bacon
1 can (15.5 oz) small white beans, rinsed and drained
1 cup red salsa
2 garlic cloves

1. Trim fat and silver from pork. Heat Grill Pan over medium heat 5 minutes. Season pork with rub. Spray pan with vegetable oil using Kitchen Spritzer. Grill pork 18-20 minutes or until Pocket Thermometer registers 155°F for medium doneness or 165°F for well done, turning every 5 minutes. Remove pork and tent with foil; let stand 5-10 minutes.
2. Meanwhile, chop onion with Food Chopper. Chop cilantro using Chef's Knife. Slice bacon into 1/2-in. pieces.
3. Cook bacon in (10-in.) Skillet over medium heat about 8 minutes or until crisp. Remove bacon from Skillet; drain on paper towels. Drain all but 1 tbsp of the fat from Skillet. Add onion; cook and stir 3-5 minutes or until softened. Add beans, salsa and garlic pressed with Garlic Press. Bring to a boil and remove from heat. Stir in bacon and cilantro. Slice pork into medallions and serve with bean salsa.